Automated Input to Dosimetry Check
Automated
Input to Dosimetry Check
Updating
from Prior Version of Dosimetry Check
Limitations
of the Automatic System
Use
prior software for situations not supported
Common
data between AutoRunDC and ConvertEPIDImages, ConvertIMATImages
Use
strategy of multiple monitored files for the same EPID
Only
one calibration image per run
Collimator
rotation not corrected automatically
Physical
wedges not automatically supported
Latest
plan used if plan name unknown in EPID file
No
IMAT integration correction
Multiple
calibration images only supported in CalibrationEPID program
Set
up file EPIDImagesDirectory.loc
Generate
Gantry Angle Shift File
EPID
Image Files Directory Structure
Introduction:
The automation feature will process EPID images when they are deposited into an input directory with the result of the DosimetryCheck auto report being produced automatically. Each EPID will have its own directory with a subdirectory for the calibration image, pre-treatment images, and exit images. The user must set up all parameters when the patient plan is downloaded from the planning system for this to happen.
Updating from Prior Version of Dosimetry Check
The patient name in the EPID files must match the name in the Dicom plan file. You have to let ReadDicomCheck create the patient entry from the name in the Dicom file rather than you create a new patient entry manually. Previous versions of ReadDicomCheck prior to 5 Jan 2015 might not create the patient name consistent with the new version with the auto release in February of 2015. As a work around you might have to rename the patient entry for a prior patient (which is a directory name) to the name format now generated to match.
Processing a plan is now called a trial. The original plan downloaded from the planning system will be copied with the date of the EPID images appended to the plan name (see Plan below). Previous versions of Dosimetry Check prior to Jan 5, 2015, will not have written new information into the plans to identify a plan as to whether it was the original plan or a trial.
We recommend that you only use the auto system for new patients if you should have a problem with a prior patient.
You will have to create and edit file EPIDImagesDirectory.loc described below, which you can copy the text from this document and use WordPad. Be aware that WordPad will save a new document with the extension .txt, whereas the file name is to end with .loc.
For Elekta systems, you must then edit the IviewGTDirectory.loc file to update to format version 2 and add the paths for the three directories for the EPID as defined in the below EPIDImagesDirectory.loc file. See the “Using the Elelkta iViewGT Imaging System” manual on the Math Resolutions website www.MathResolutions.com. The patient name and beam names from the Elekta IviewGT data base must match that in the Dicom RT plan file from the planning system.
If you have a problem, run AutoRunDC in a command prompt window so that you can see messages as the program runs.
Limitations of the Automatic System
Use prior software for situations not supported
For any limitation you simply can use ConvertEPIDImages (or ConvertSiemensImages) or ConvertIMATImages as the case may be instead.
Common data between AutoRunDC and ConvertEPIDImages, ConvertIMATImages
Be aware that ConvertEPIDImages and ConvertIMATImages will update the
EPID deconvolution kernel used and the monitor units used if you change that
during the run of those program, but not the central axis center coordinates
and central axis signal value, should you use those programs in the interim. Therefore the calibration image used with the
Convert…Images programs will not replace the central axis coordinates, the
central axis signal value, nor the calibration image used by the automation
program, but will change the monitor units used and the EPID deconvolution
kernel if you select something different.
However, those two programs will
now default for the center all, calibration all, to the image and values last
used by AutoRunDC.
So you will not have to select an image if the prior is still
current.
Use strategy of multiple monitored files for the same EPID
As
describe several places below, you have the strategy of make a separate entry
in EPIDImagesDirectory.loc to split processing between two different
situations. AutoRunDC
will not proceed to generate an auto report if all the beams do not have a fluence file. Hence
one run will stop and the second that completes the distribution of fluence files will proceed.
Only EPID images
Only EPID images are processed here from any of Varian, Elekta, or Siemens machines. Diode and ion chamber arrays are not supported here.
Warning Patient Name:
The patient name in the EPID Dicom image files must be contained in patient directory name derived from the Dicom RT plan file. The directory name can be longer such as with a middle name. The comparison is done case insensitive. Otherwise it will not be possible to match the EPID image to the patient. See ReadDicomCheck below. But as a mitigation, you can rename the patient directory to correspond to the name derived from the EPID file.
Only one calibration image per run
This feature will not allow different calibration images for a case. The current calibration image will be used for all the images that are processed. If you had to move the EPID for some images of a plan, timing is an issue here. It is possible that you could submit a calibration image and the clinical images it is to be used for. Than after those images are processed you could submit a new calibration image followed by the remaining EPID images it is to be used for. The program will not proceed to generate the Auto Report until all beams have a fluence file. Another alternative is to create two separate entries in EPIDImageDirectory.loc. One to use with a centered calibration image and one with the off set, with the clinical images sent to the respective monitored directories. Otherwise we recommend that you use ConvertEPIDImages or ConvertIMATImages.
Warning Calibration Image:
The calibration image to be used must be submitted first.
Once read, it will be used for all subsequent cases until a new one is provided. The CalibrateEPID program provides another method of setting the calibration.
Collimator rotation not corrected automatically
Collmator rotation correction is not supported if you have rotated the collimator from the plan angle. A warning will be written to the log file that the collimator angle did not agree. You will have to run DosimetryCheck, select the plan, and compensator for the changed collimator angle by editing the beam in question.
No flood view correction
Correction with a flood view is not supported here.
Physical wedges not automatically supported
Physical wedges are not supported as here a single EPID deconvolution kernel is used for all images for a particular EPID and energy. The kernel must be one that includes support for exit images if exit images are to be processed. However, you could make a separate entry in EPIDImagesDirectory.loc to handle the clinical images with a wedge.
Latest plan used if plan name unknown in EPID file
If the Dicom EPID image file does not specify the plan name or the Dicom unique identifier (UID) for the plan, then the latest plan will be assumed. Eclipse with Aria will put the plan UID into the EPID image header. Other systems do not. For a name we only have the CT study description. With Elekta the plan name is available in their data base and that is written to the EPID Dicom file by IviewToDicom. Therefore under some circumstances, you might not be able to be access two different plans for the same patient with the automatic system, such as alternating treatment plans on successive days.
No IMAT integration correction
For IMAT (RapidArc, VMAT), correction of images with a single integrated image is not supported.
Multiple calibration images only supported in CalibrationEPID program
Multiple images for the calibration image are only supported if you import them with the CalibrationEPID program described below. You have available the strategy of making a separate entry in the EPIDImagesDirectory.loc file for IMAT as opposed to IMRT.
Set up file EPIDImagesDirectory.loc
In the program resources directory (normally c:\mathresolutions\rl.dir on Windows systems, rl.dir in the user’s home directory otherwise) must be the file:
EPIDImagesDirectory.loc
which uses the ASC file standard for DosimetryCheck (see the System2100 manual section “Program Resources Files”).
An example file follows which defines only one EPID in the example shown. If you have dual matched machine, while the beam data may be matched the EPID is not. If that case you define a separate EPID for each machine, but each EPID will have the same machine data name. It will be an error if the machine data name does not match the machine name in the plan being run. You must define every EPID in your system in the below file.
Matched machines
Note that file format 2 has an extra flag (for versions on or after 13 March 2015) whereby one can change whether or not a mismatch between the machine directory name in the file and the plan is an error or a warning. Normally it should be an error. However, if you have matched machines and machine 1 goes down and you treat and take images on machine 2, you will have to submit the images to machine 2 (assuming the EPID response is not matched which is normally the case). If in the below file machine 2 identifies a different name for the machine beam data (the machine directory name), then the machine name in the plan will not agree and this will be an error. The flag controls whether or not the program will still compute the auto report. If set to 0, it will not. If 1 it will but will also popup a warning message.
The flag in file format version 1 is defaulted to 0.
Warning Matched Machines
If the program is running on a server where you will not see the warning, do not set the flag to 1. Use the below alternative scheme instead.
As an alternative, if you have two matched machine with different machine directory names, consider this scheme:
EPID 1 has machine name machine 1
EPID 2 has machine name machine 2
EPID 3 has the deconvolution kernel for machine 1 but has the name for machine 2
EPID 4 has the deconvolution kernel for machine 2 but has the name for machine 1.
In the above scheme, the images taken on machine 2 for a patient normally treated on machine 1 would be submitted to EPID 4.
/* file format version */ 1
// time to wait between checking EPID directories in seconds
300
However,
file format version 2 has an extra flag (which is otherwise defaulted to 0):
/* file format version */ 2
// 0 means non-matching machine name is an error, 1 is a warning
0
// time to wait between checking EPID directories in seconds
300
/* number of EPID's defined below */ 1
// repeat the below eight entries for each machine-EPID:
// machine EPID name
which defines a specific EPID.
<*VarianSSD*>
// The
machine name for the beam data. Each machine has a unique EPID
// name.
// But different EPID
names can have the same machine name if you have
// matched machines.
// But this entry does
NOT pick the data to use to calculate.
The
// machine named in the
treatment plan is used for calculation.
// It will be an error
if the plan has a different machine name if 0 above.
<*VarianSSD*>
// directory for
calibration images:
<*g:/VarianSSD/Calibration.d*>
// margin to ignore
around perimeter of image for centering in pixels
2
// time to wait in
seconds after getting a calibration image before
// proceeding to be sure
transmission is complete for all images that
// will follow.
120
// directory for
pre-treatment images:
<*g:/VarianSSD/PreTreatment.d*>
// directory for exit
images:
<*g:/VarianSSD/Exit.d*>
// time to wait in seconds
after getting an EPID clinical image before
// proceeding to be sure
transmission is complete for all images.
120
Repeat
the above eight entries for subsequent EPID’s.
In the file standard, items are to be separated by white space and the
comments are ignored. So the below would
be same file for eight entries:
<*Varian*> <*VarianSSD*> <*g:/Varian/Calibration.d*> 2 120
<*g:/Varian/PreTreatment.d*> <*g:/Varian/Exit.d*> 120
In
the above file, you name the directories where EPID images are to go for a
particular EPID, and for that EPID the separate directories for the calibration
image, for pre-treatment images (nothing was in the beam), and for exit images
(patient was in the beam) taken during treatment.
In
the above first example the EPID name is VarianSSD. The machine data directory has the same name. The EPID name can be different (see the next
example). The list of eight items would
be repeated for a second and subsequent EPID’s.
When
a calibration image is processed, the information is saved and will be used for
all subsequent clinical images until a new calibration image is received and
processed.
TomoTherapy
For
TomoTherapy machine, only the Dicom
file with the detector data embedded is supported. The binary file has no header information
such as the patient name, and so cannot be used by AutoRunDC.
However, the Dicom
file does not have the plan name in it.
The latest plan imported will be selected. Create an entry in EPIDImagesDirectory.loc for
the TomoTherapy machine, and note that the
calibration sub-folder will never be used.
Timing
Timing
is a major issue. The automated program
is monitoring the above directories for new files. Suppose at some instance new files are
detected. There is no way to know if
more files for the same case are yet to come.
The number of files generated for IMAT, for example, is unknown. For IMRT one might have done a carriage shift
with two files per beam. Some care must
be taken in assigning times in the above file rl.dir\EPIDImagesDirectory.loc. Questions to be considered are: How often are cases with EPID images
generated? How long does it take all
images to arrive in the destination directories? The time delay after detecting a new image
should be long enough to guarantee that all succeeding images have
arrived. The calibration image should
arrive well in advance of the EPID images to be sure that the calibration image
is processed before the clinical images.
As an alternative, the calibration image can be processed with program CalibrateEPID described below.
Program CalibrateEPID.exe
Calibration
images deposited into the defined calibration directory for a particular EPID
will be processed automatically. When a
calibration image is processed, the information is saved and will be used for
all subsequent clinical images until a new calibration image is received and
processed.
However,
at any time you can also manually import a calibration image or check the
status of the current image. Be aware that ConvertEPIDImages and
ConvertIMATImages will update the EPID deconvolution kernel used and the
monitor units used if you change that during the run of those program, but not
the central axis center coordinates and central axis signal value, should you
use those programs in the interim.
Therefore the calibration image used with the Convert…Images programs
will not replace the central axis coordinates, the central axis signal value, nor the calibration image used by the automation program.
Run
program CalibrateEPID from DosimetryCheckTasks:
 .
.
In
the first toolbar you will select the EPID and energy:

CalibrateEPIDToolBar
On
the next toolbar you have the options:
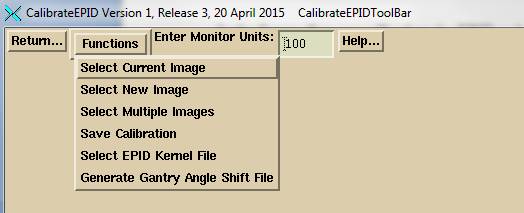
Select
Current Image
Select
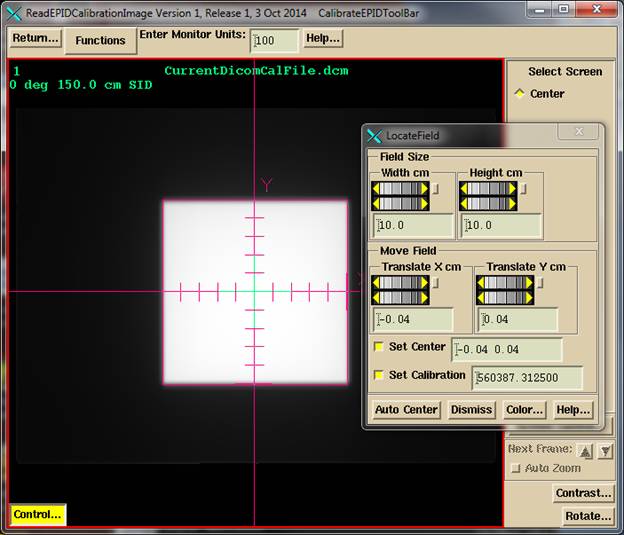
Current Image to view the current calibration image. Hit the “Control…” button on the lower left
hand corner to change the centering:
Select
New Image
Select
New Image to select a new calibration image.
Select Multiple Images
You
may select here multiple calibration images to be added together for a single
calibration. All of the images must be
the same pixel size, same image size, and same SID. Note that multiple images are NOT supported
by the monitored calibration directory in AutoRunDC. You can only create a multiple calibration
here for use with AutoRunDC. If you are using multiple images because of
difference between IMRT mode and IMAT mode, please advise us as there is
information to correct that situation.
We
can also suggest the strategy of making a second EPID entry in
EPIDImagesDirectory.loc and use one for IMRT and the second for IMAT if you
must use multiple calibration images for IMAT.
Monitor
Units
Type
in the monitor units used for the calibration image.
Save
Calibration
Select
this option to save new settings and or image.
Select
EPID Kernel File
Use
this option to select the EPID deconvolution kernel file to use for the EPID
and selected energy.
Generate
Gantry Angle Shift File
This
option is presently not available and this file must be generated
manually. See the ConvertEPIDImages
manual “Centering and SID correction for gantry angle”
for details.
ReadDicomCheck

Let ReadDicomCheck create the patient name
It is important that you let
the program create the patient name entry for a new patient. The EPID Dicom images files
must contain the same name in the same format in order for the program to be
able to associate a particular image file with a particular patient. The program makes a directory entry in the
patient’s directory (defined by rl.dir/PatientDirectory.loc) from the Dicom name and it is this text that the program looks to
match up after processing the name found in the EPID Dicom
file with the same algorithm. The patient entry name is a directory (folder)
which you can change if necessary at any time but only when a program is not
accessing that directory.
Patient (and couch)
model must be complete
In
the ReadDicomCheck program, after importing a plan
from the planning system, you must
- Check that there is a body outline,
- Compete any couch model,
- Assign all densities to region of interest
outlines,
- Review and make all selections for the auto
report.
If
information is incomplete, it will not be possible to automatically compute the
dose, or generate the auto report. The
conversion of exit images to in air fluence depends
upon the density assignments, body outline, and couch model. The computation of dose depends upon these
same factors.
Auto Report must be
selected
Finally
you must hit the “Auto Report” button to specify information for the auto
report, such as the gamma analysis normalization dose value. If you fail to do so, with Dosimetry Check version 4 release 7 and later, you can
access the auto report without having fluence files
imported. However, be aware that once a
trial plan is created, it is not updated should AutoRunDC
process EPID images for the same trial (date).
IviewToDicom
Please
review the IviewToDicom section of the manual http://www.mathresolutions.com/dcman.d/readiviewGT.htm for specifying the directories to write the
images to in the IviewGTDirectory.loc file.
On
the IviewFileListReport popup, an example shown
below:
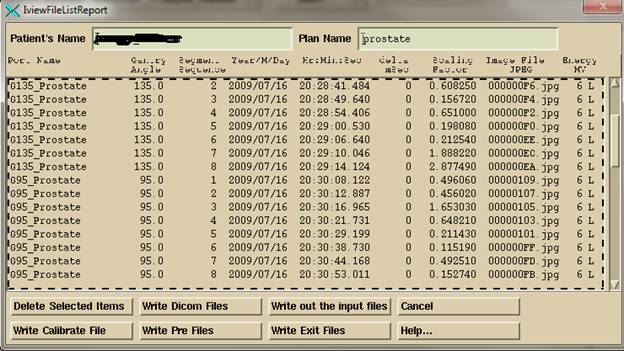
You
must select where the image are to go among calibration images, pre-treatment
images, or exit images. Further, for an
IMAT (VMAT) case, you will then be prompted to select the inclinometer which
will then be written into the same directory where the image files were
put. If you fail to do so, all the images
will have the same gantry angle and you will have to process the images a
second time.
Program AutoRunDc
The
EPID images are processed by program AutoRunDc, which
monitors the directories defined by rl.dir/EPIDImagesDirectory.loc. Run this program from DosimetryCheckTasks. This program will run until the computer is
turned off. One could add it to the
start up menu. Only one instance of the
program will run. You can check if it is
running by going to the Task Manager on a Windows machine the ps command on Linux.
Program AutoRunDc will process the EPID images
and submit to the batch que the case for generation
of the auto report. The batch will run
the case regardless if the patient is otherwise opened and locked by another
program (removing the lock). Check for
the existence of rlLockFile in the patient’s
directory. However, the AutoRunDC will create a new trial plan regardless of
whether or not the patient directory is otherwise locked.
Monitoring the Background Programs
To
prevent program creep in size, AutoRunDC is actually
split into three executables. AutoRunDC will call AutoProcessCalibrationEPIDImage
and AutoProcessEPIDImages.
Whether
the above programs are running can be viewed with the Windows Task Manager
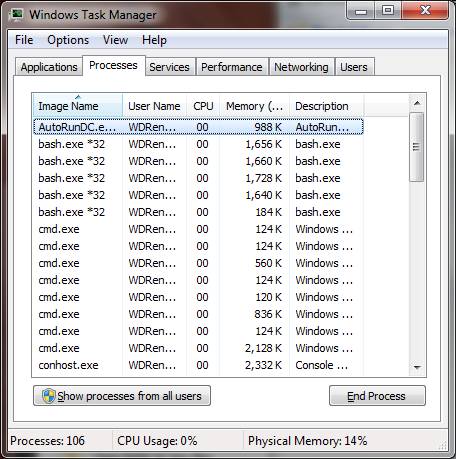
which can be gotten by hitting
control-alt-delete on the keyboard. To
end a process, select the process and hit the “End Process” button.
On linux,
type the command:
ps
–e
To find a
particular process type ps –e and pipe to grep to look for a program name:
ps –e | grep Auto
and you will
get:
3250 pts/1 00:00:00 AutoRunDC
and to end
the process type:
kill 3250
Use the above to determine if something
is running or not.
Plan Names
The
plan retains the original plan name downloaded from the planning system. For each trial, the date of the EPID images is
appended to the plan name for the particular trial. So if PROSTATE is the original plan name, PROSTATE2014_08_20
will be the plan processed with EPID images taken on August 20, 2014. A ‘p’ will be appended for pre-treatment, ‘e’
for exit. A patient entry will then have
the original plan data, and subsequent plans for each trial.
Beam Names
In
order to associate an EPID image file with a particular treatment beam of a
plan, each beam in a plan must have a unique name. Further, there are some restrictions due to
how the name ends up in the EPID Dicom file
header.
On
Elekta machines, our utility IviewToDicom
will put the beam name into the Dicom (3002, 2) image
label field. That utility relies on the
correct beam name being in the IviewGT data base.
With
Varian, Portal Vision adds extra characters to the beam name in the image label
field. For example, the beam name ARC1
becomes 01-ARC1-1_1_55 and ACR2 becomes 02-ARC2-2_1_116. In both cases, the last number is an image
number for RapidArc as there are multiple images for
each beam. For IMRT on Varian, the beam
name “A3 rao” becomes “A3 rao_1-6_1_”. Another example is beam LAO_30 becomes LAO_30-1_1_3.
The
algorithm we have adopted is to first put out only the alpha characters first
(a-z and A-Z) in the beam name and the name in the Dicom
image label field. The alpha characters
must match. So in the above example ARC
would be compared successfully to both image files for arc 1 and arc 2. Then the algorithm tests if the beam name is
within the image label. Here ARC1 would
not be in the image label for an image from arc 2 but would be so for an image
from arc 1.
If
you name one beam g0 and another g00, the algorithm can fail to correctly
associate as an image from beam g0 could be assigned as belonging to beam
g00. Naming beams strictly by their
gantry angles will probably fail due to the extra characters that are added by
Varian portal vision.
Log Files
AutoRunDC will create a log file
describing its activities. The log file
will be popped up for viewing if any error occurs. This is the means to find out why an auto
report failed to appear. The log file is
originally created in the temporary directory defined by rl.dir\tmp.dir.loc and will be moved to the patient’s directory to
the directory FluenceFiles.d\LogFiles.d
if gotten as far as successfully processing a plan.
Upon
initial appearance of images, the log file is created from the name of the
EPID, such as VarianSSD_cal_log, VarianSSD_pre_log,
and VarianSSD_exit_log. To that
is appended the Dicom date and time the log file is
created followed by a underscore version number. The version number is incase the log file up to a point needs to be
displayed and new file started to continue.
An example is VarianSSD_pre_log20150211185935_1 (see below for
description of the Dicom date and time).
Each
processed plan will have a separate log file starting with the name of the
plan. Appended to the name of the log
file will be the Dicom date and time that the log file was created.
An example would be: PROSTATE2014_08_20p20150211185937 where the log
file was created 2015, month 02, day 11, hour 18, minute 59, second 37.
EPID Image Files Directory Structure
AutoRunDC expects all the image files to be in the monitored directories defined by the EPIDImagesDirectory.loc file: the calibration, pre-treatment, or exit directory or sub-directories as will be defined here. The EPID files are to be in the monitored directory or up to two directories deep, but not deeper than two sub-directories with the only exception described below. The program will first move all files found up to two directories deep up to the top directory, and then delete all non-empty directories. The files are then sorted as described below identical to the output of IviewToDicom and the sort function in ConvertEPIDImages and ConvertIMATImages. Therefore images files so sorted may also be in the monitored directories except for the calibration directory. In the calibration directory files may only be up to two deep.
The clinical beam files may be sorted into the directory structure described below that is produced by the identical sort function in AutoRunDC, ConvertEPIDImages, ConvertIMATImages, or produced by the program IviewToDicom. The program first sorts files found into the directory structure starting with the patient’s name, then a sub-directory named by the date of the EPID file, followed by a sub-directory using the name of the plan or the study description if either is available, with the energy appended to the sub-directory name. IMRT files are expected to be in this directory with IMAT files in a sub-directory. However, IMAT images belonging to the same beam will be used if found in either directory with the exception of files from IviewToDicom. IviewToDicom will ignore the composite files for IMAT in the upper level and and the segment files for IMRT in the lower level. Note in all cases EPID Dicom files start at three deep, not two, in this organization.
Any other directory structure will not work. It should be noted that the output of IviewToDicom uses the same directory structure and AutoReadDC expects that organization. The sort utility with the Convert…Images programs sorts the same way. In these cases the directory with the patient name can be moved to a monitored directory.
Moving EPID Image Files
Dicom images that are encountered that cannot be assigned to a patient or plan are moved to the directory defined by the loc file rl.dir\NewEPIDImagesDirectory.loc which must not be a directory that is being monitored by program AutoRunDC. Once a case is processed, all the images involved will be move to the patient’s directory InputEPIDFiles.d. The files will be in a sub-directory by the patient name, date of the EPID file, followed by the name of the plan. These files are available for re-processing. You could simply copy them back to the EPID auto directories, or process them with the ConvertEPIDImages or ConvertIMATImages programs.
To auto process, you can also just move the patient name directory back to the monitored directory.
RMU Files Produced
The in air fluence files in the units of rmu are directly deposited into the plan created for the trial. This is different from ConvertEPIDImages and ConvertIMATImages programs which puts the rmu files into a subdirectory of FluenceFiles under the plan name, and which are subsequently moved to the particular plan by the DosimetryCheck executable.