Exit-Transit Dose Option
for
Dosimetry Check
13 August 2010
Set
Up for the Plan Within Dosimetry Check.
After
conversion of exit image files.
Introduction
This option provides a means to assess the correctness of treatment during the course of treatment.
This method should be used in addition to pre-treatment assessment of
the treatment delivery and should not replace pre-treatment quality contol.
There are two reasons for the above restriction: (1) you should not apply radiation therapy to a patient without some prior quality control, particularly considering complicated treatments such as IMRT and IMAT, as an initial incorrect treatment could have detrimental effects. And (2), the reconstruction of dose from exit images will not be as accurate as from using pre-treatment images. The exit method provides a way to check for consistency during treatment. Experience will be needed to evaluate how this procedure should fit in with the institutions quality control policy.
Theory
The program uses two mechanisms to convert exit images to pre-treatment in air x-ray fluence. First, given the geometry of the beam and its coordinates, each pixel is ray traced back though the patient to find the water equivalent thickness that the ray went through. This means that the image must be properly assigned to the correct beam and gantry angle. It also means that the method of conversion of CT number and ROI structures to density must have been determined in advance, as well as any correction for the treatment couch. Second, the thickness data is used with a two dimensional deconvolution kernel (that is a function of radius and thickness) to convert each integrated exit image to the in air x-ray intensity fluence image in the units of rmu (relative monitor units) before the patient. An in air (typically 10x10 cm) calibration image is used as before to normalize the images to rmu.
Method of Operation
If you have already done a pre-plan test, the steps shown later below starting with the Plan Download, will already have been accomplished. Run Dosimetry Check, select the pre-plan, and then select to copy that plan, giving it a new name. The dose from the exit dose plan will be compared to the planning system dose that you downloaded. If you have already accomplished an evaluation from using exit images, you might what to do future comparisons with the first exit evaluation. In that case, select the exit evaluation that you have done, and then select under Options on the Plan toolbar to down load to Dosimety Check. You will be asked to enter a new plan name. In this instance, the dose computed by Dosimetry Check for the present plan will become the dose that will be compared to in the new plan. Do not get confused as to which dose the reconstructed dose is being compared to. Labels will appear on the points printout as to plan or prior Dosimetry Check dose.
The steps that must be completed and correct before processing exit images are shown below:
Plan Download
The treatment plan is to be downloaded to Dosimetry Check using either the Dicom RT or the RTOG protocol. The RTOG protocol has been replaced with Dicom RT in the radiotherapy community. Select “Read in Dicom RT protocol files” from DosimetryCheckTasks. This will run the utility program ReadDicomCheck which is documented in the Dosimetry Check manual.
Set Up for the Plan Within Dosimetry Check
Dosimetry Check must be set up so that it will compute the dose with all the proper parameters before you convert your measured fields, among CT number to density conversion, the proper body ROI volume, and any correction for the treatment couch. To do this you should run Dosimetry Check and retrieve the intended plan. Dosimetry Check will tell you that you don’t have the measured fluence fields yet if this is a new plan, and you are to ignore that for the time being as that will come later below.
Check that you have the proper number of treatment fields for the plan. Review the method for converting CT number to density and that the correct conversion file is chosen.
Check that the proper ROI volume is selected as the body outline. If you are doing to correct for the couch, then you must set that up prior to converting the measured field images. Because Dosimetry Check currently has no provision for considering structures external to the body, you must form a union of the body volume and the external couch components, and subtract out any hollow parts of the couch components either by subtracting a separate ROI structure or accounting for holes within an ROI structure
(see the System2100 manual under outline regions of interest).
Check that if a density is being assigned by any ROI volume, that the assignments are correct.
Measure the Radiation Fields
You must next measure the radiation fields during treatment. You should consider whether or not the beam will pass through any support structures of the couch, after passing through the patient, particularly if you are not correcting for the couch structures. Each treatment beam will have to be integrated with your measuring device during treatment to record all of the radiation field down stream from the patient.
You must also integrate a calibration field to be used with the above measured fields for normalization. For the calibration field, there should be nothing in the beam and the imaging device must be in the same position relative to the gantry of the treatment machine. You still have the option of recording a flood view if the imaging device was moved off center from where its internal flood correction was done.
If for IMAT and you have to correct for continuous versus single integration mode, then you will have to capture the exit images on two different treatment days. One day to integrate the entire arc into a single image in IMRT mode, and the next day to integrate the arc in continuous (cine) mode to obtain separate images at discrete gantry angles.
Processing of Measured Fields
IMRT
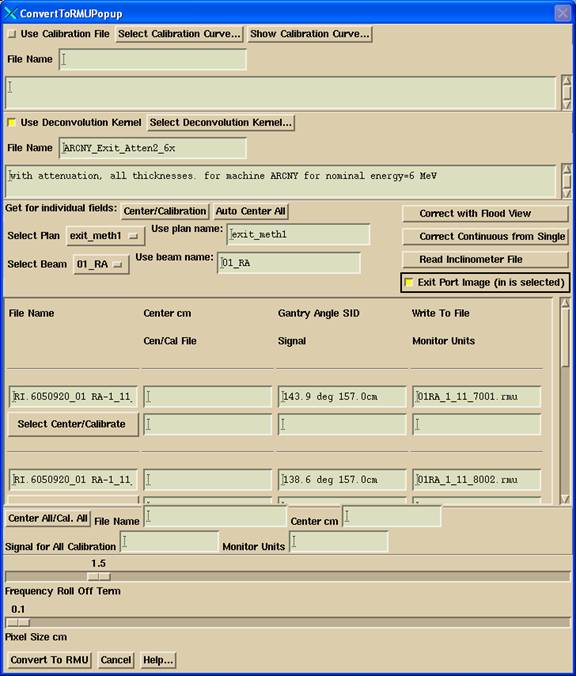
For IMRT you will use ConvertEPIDImages (or any of the other programs provided to read images files from some specific device). See the manual for this program. After selecting the images files to be converted you will be presented with the following popup:

There are several additional items you must pay particular attention to (in the order of top to bottom)
(1) You must select a deconvolution kernel that supports exit dose dosimetry.
(2) You must select the Exit toggle button (in, yellow, is selected).
(3) You must select the correct plan that the image files are for.
(4) For each file to be converted, you must select the correct beam the file is for.
IMAT (RapidArc, VMAT)
For IMAT the popup will be slightly different:
(1) You must select a deconvoluton kernel that supports exit dose dosimetry.
(2) You must select the correct plan that the image files are for.
(3) You must select the correct beam that the files are for. You can only convert the images for a single arc at a time.
(4) You must select the Exit toggle button (in, yellow, is selected).
(5) Verify that the proper gantry angle has been assigned to each image.
In both cases, IMRT or IMAT, for each field image, the program will trace back through the patient CT scan space to compute the equivalent water thickness of the rays that reach the pixels of the exit image. Therefore the proper beam has to have been selected for each image file, and things like the method of CT number to density conversion and correction for the couch must be correct at this time.
After conversion of exit image files.
Run Dosimetry Check as you normally would. Select the patient and the exit dose plan. If you properly selected the correct beams for the exit images above (or they were copied when you copied plan), the program will report that it has found new images. Select those new images. If you find that you have made any mistake in assigning an image to a beam, then you will have to convert those images again as the ray tracing through the patient is unique to each beam and image file, and the CT number to density and density of ROI’s are considered during that ray tracing. If the plan fails, then you might what to consider redoing the pre-treatment fields for evaluation of the reconstructed dose, and evaluating all treatment plan variables.