Dosimetry Check Software Installation Instructions for Microsoft Windows Operating Systems
Contents
Dosimetry
Check Software Installation Instructions for Microsoft Windows Operating
Systems
Step 1. Install
Required Component Programs:
b. Remove
Exceed install folders
c. Check Exceed default settings
d. Adobe Reader and GhostScript (if not already
installed)
Step 2. Turn off
“Show window contents while dragging.”
Step 4. Download
and Install Dosimetry Check
Step 6. Verify path to GhostScript is correct
Step 7. Run Dosimetry Check to generate the Computer ID
Step 8. E-mail
LifeLine Software to Obtain License Key
Step 9. Remove
Exceed Toolbar (for Windows Vista only)
Step 10.
Identifying and Setting the number of Threads/Core Processors in
Dosimetry Check
a. Setting
the path variable to Exceed dll’s.
Read Carefully to prevent problems
Step 1. Install Required Component Programs:
a.
Install
Exceed
Download the Exceed program files using the following links:
http://lsidownloads.s3.amazonaws.com/DCFileShare/Exceed64Patch.exe
http://lsidownloads.s3.amazonaws.com/DCFileShare/Exceed14_3D.zip
http://lsidownloads.s3.amazonaws.com/DCFileShare/Exceed14.zip
http://lsidownloads.s3.amazonaws.com/DCFileShare/installmotif64.exe
The Exceed14.zip and Exceed14_3D.zip files must first be unzipped. To unzip these files, simply perform a right mouse click and select “Extract All…” from the resulting pop-up menu. The programs should be installed in the order listed below:
1. Exceed 14 – Go into the “Exceed14” folder that was created when the Exceed14.zip file was unzipped. Locate the Msetup.exe file and run it. Follow the prompts for the installation and choose the default options. If prompted to choose between a “Personal” and “Administrative” installation, choose the “Personal” installation.
2. Exceed 14 3D – Go into the “Exceed14_3D” folder that was created when the Exceed14_3D.zip file was unzipped. Locate the Msetup.exe file and run it. Follow the prompts for the installation and choose the default options.
3. Exceed 64 Patch – Run the Exceed64Patch.exe program and follow the resulting prompts on the screen. If presented with a choice, please choose the default options.
4. Motif 64 – Run the installmotif64.exe program and follow the resulting prompts on the screen. If presented with a choice, please choose the default options.
b.
Remove
Exceed install folders
Remove the Exceed installation folders from the hard drive after installation. These folders refer to the “Exceed14” and “Exceed14_3D” folders that were mentioned above. These folders should be permanently removed and not just moved to the Recycle Bin.
Important!: A problem will occur if the Exceed install program (and related sub-folders) is still present on the hard drive. The Install program must be erased off the hard drive after installation if it is not done automatically. This is true for Exceed and Exceed 3D.
For more information please
refer to “Exceed Trouble Shooting” at the end of these instructions.
c. Check Exceed default settings
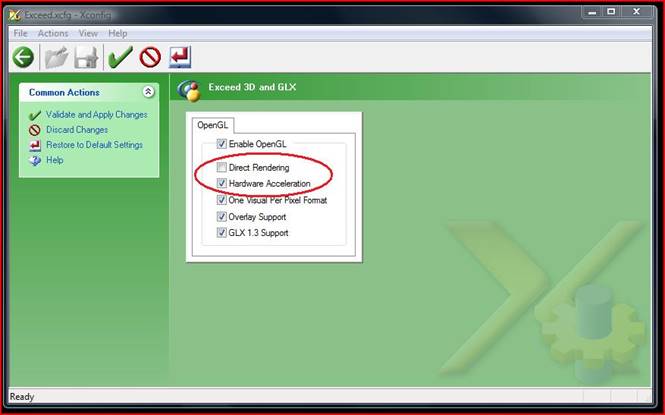
“Direct Rendering” needs to be turned off.
And
“Hardware Acceleration” needs to be turned on.
These are usually the default settings,
but it is good to check to make sure.
There are two ways to check this:
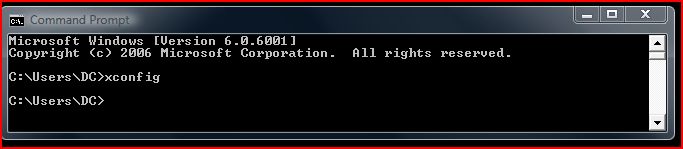
Method 1: In a Command Prompt
window type: xconfig and then hit
enter.
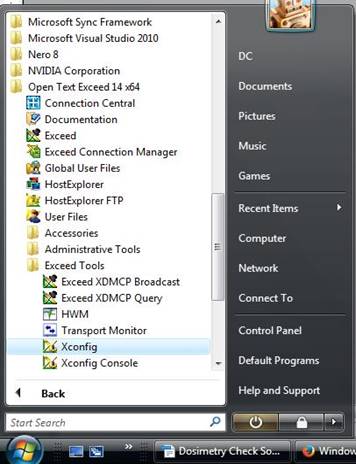 Method 2:
Go to the Start menu and select All Programs and then select Open Text Exceed. Then select Exceed Tools and then select Xconfig.
The result for both should look
like below:
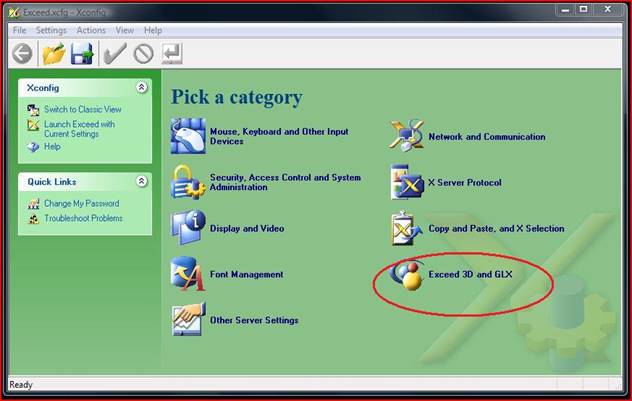
Select “Exceed 3D and GLX” in the Xconfig window.
Check and make sure Direct Rendering is off and that Hardware Acceleration is on. This is shown in the window below:
d.
Adobe Reader and GhostScript (if not already
installed)
NOTE: If you are upgrading Dosimetry Check, then you may skip this step and move on to Step 2.
Purchase and install:
Adobe Reader (if not already installed)
GhostScript
Go to http://www.ghostscript.com/download/gsdnld.html
and download the current 32 bit GhostScript program.
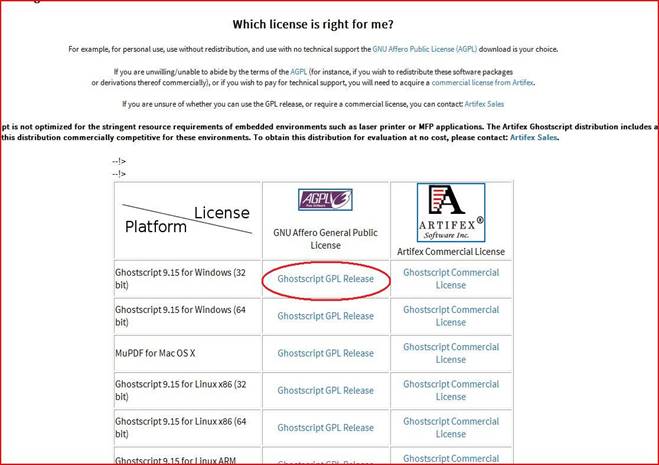
Important!: GhostScript is used for converting postscript files to PDF files. A problem will occur if the path to the GhostScript file is not specified correctly in a location file in Dosimetry Check. DO NOT skip step 6 of these instructions to Verify that the path to GhostScript is correct in the c:\mathresolutions\rl.dir\gs.loc file.
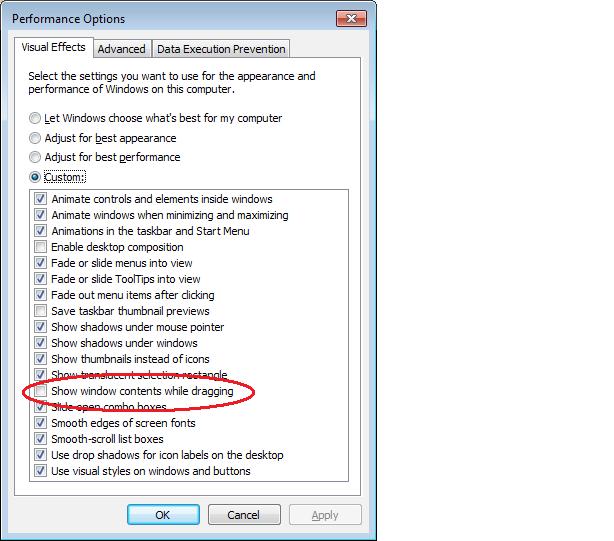
Step 2. Turn off “Show window contents while dragging.”
NOTE: If you are upgrading
Dosimetry Check, then you may skip this step and move on to Step 3.
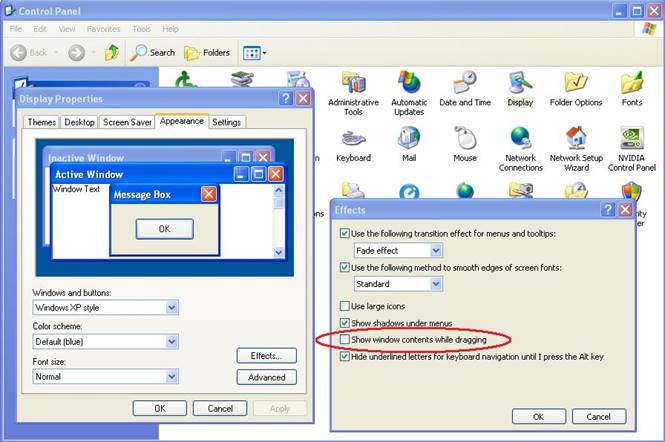
We recommend to NOT show contents of Windows while moving them so as not to cause a cascade of redraw events should you drag an application window across our application or a dialog across a graphics window.
Windows XP: Go to Control Panel and select "Display", then "Appearance", then effects", and UN-click "Show window contents while dragging".
Vista: Go to Control panel and select "Personalize Appearance and Sounds". Then at the bottom select "Open classic appearance properties for color options", select "Appearance" on "Appearance Settings", then select "Effects" and toggle off "Show window contents while dragging".
Vista and XP shown below.
Windows 7: start
to type the word performance in the text area above the start menu (you only need "per" as shown
below), and then on the pop-up that you get,
shown below, Select "Performance 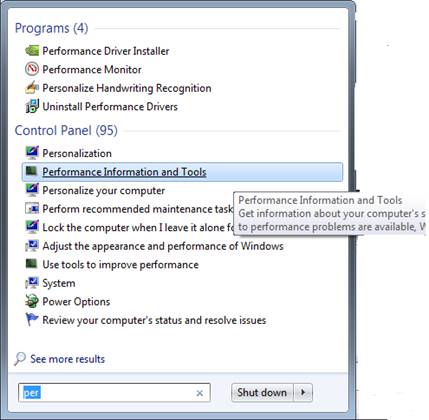 Information and Tools"
On the next pop-up select "Adjust visual effects" on the left.
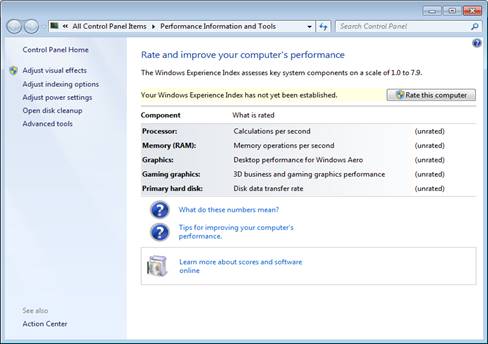
Then UN-click "Show window contents while dragging"
Alternate Windows 7 instructions:
1. Press Windows Key + R.
2. In the Run window, type system properties advanced, and click OK.
3. In Performance section, click Settings.
4. In the box shown above, uncheck Show window contents while dragging, and click OK.
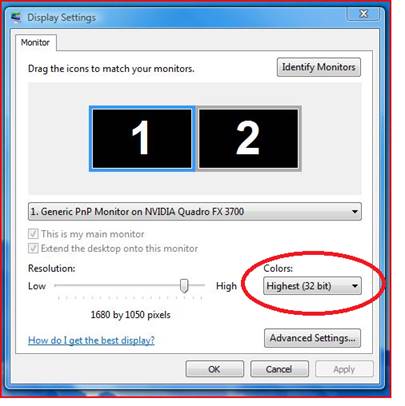
Step 3. Check that Windows Color Quality is set to 32 bit and the Color Scheme is set to Windows Aero
NOTE: If you are upgrading Dosimetry Check, then you may skip this step and move on to Step 4.
For Windows Vista only the Color Quality and Color Scheme need to be changed. On Windows 7 this is the default setting.
Changing the Color Quality:
For Windows Vista, go to Control Panel and select Personalization. Then select Display Settings. Under the colors button select Highest (32 bit). Shown below:
For Windows Vista, the Color Scheme needs to be changed to Windows Aero as well.
Changing the Color Scheme:
For Windows Vista, go to Control Panel and select Personalization again. Then click on Windows Color and Appearance. From that window you will want to select Open classic appearance properties for more color options. See picture below:
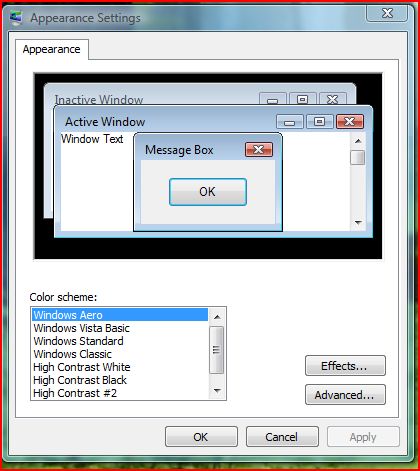
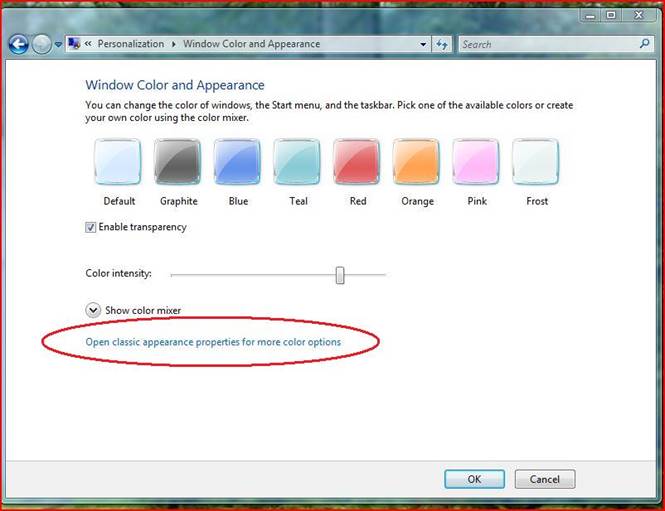
Then select Windows Aero.
Step 4. Download and Install Dosimetry Check
For Windows operating systems, click on the following link to download the current version of DosimetryCheck: http://www.mathresolutions.com/pub.d/installdcV5R8.exe
Run the Dosimetry Check installation program called installdcV5R8.exe . If prompted for password to run the install program, please contact LifeLine Software’s technical support staff at techsupport@lifelinesoftware.com to obtain the password.
After the installation is complete, restart the computer.
Important! Do not run Dosimetry Check until Steps 5 and 6 are completed. Running Dosimetry Check is Step 7.
Important! Remember to restart the computer after the installation is complete!
Step 5. Create Dosimetry Check Icon and Eliminate the Command Prompt window from running Dosimetry Check Tasks.
NOTE: If you are upgrading Dosimetry Check, then you may skip this step and move on to Step 7.
After Dosimetry Check is installed a shortcut icon will be created and will be on the desktop. However, the shortcut icon will have no picture on the icon. Also, when running Dosimetry Check the Command Prompt window will keep popping up unless the setting is changed.
Both these issues can be solved at the same time:
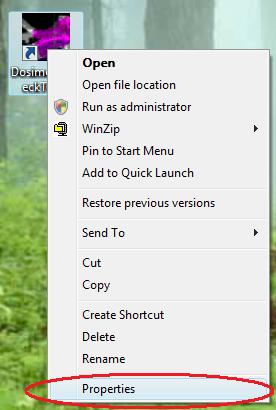
Right Click on the Icon with the mouse and scroll down and select Properties.
(Note: the picture shown already has the Icon image)
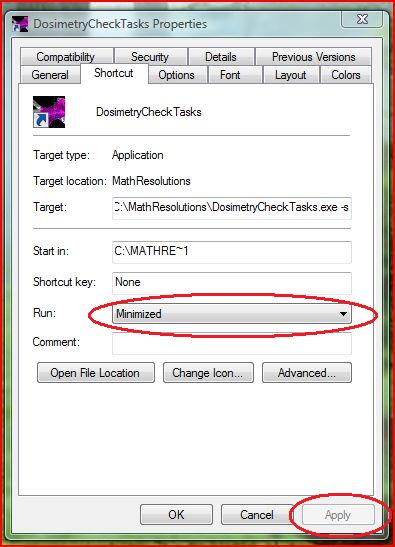
Then next to run Run: select Minimized and then click on the Apply button at the bottom of the window. This will eliminate the Command Prompt window from popping up while Dosimetry Check is running.
Important!: Remember to click on Apply to make the change permanent.
Next, set the icon image by clicking on the Change Icon button. In the next window click on Browse.
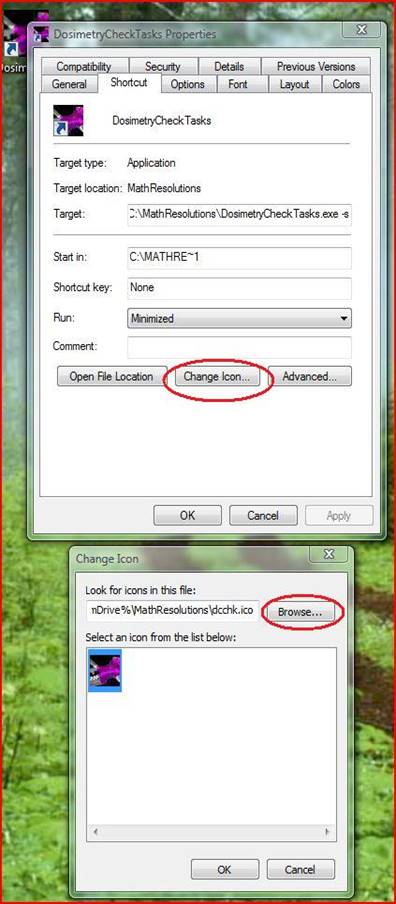
Next, navigate through the hard drive to the MathResolutions folder. In that folder the icon image will be stored under the file name dcchk.ico. Click on dcchk and that will add the image to the image: See picture below:

Remember to click on the Apply button after the icon is selected.
Step 6. Verify path to GhostScript is correct
NOTE: If you are upgrading Dosimetry Check, then you may skip this step and move on to Step 7.
After installing GhostScript the program will be installed in a certain location. For example:
c:\Program Files\gs\gs9.15\bin\gswin32.exe on a 32 bit system
or
c:\Program Files (x86)\gs\gs9.15\bin\gswin64.exe on a 64 bit system
Note: The location and file name may change depending on the version of GhostScript that was installed.
The location of GhostScript should match the “defined” path in Dosimetry Check. It is important to verify and possibly change the “defined” path in Dosimetry Check.
First, find the location of GhostScript on the Computer. An example of a location is above:
To
change the “defined” path in Dosimetry Check, go to the Start menu and select All
Programs. Then, under the Accessories folder open up the
program WordPad.

When WordPad
is open
click on File and then Open at the top left of the window.
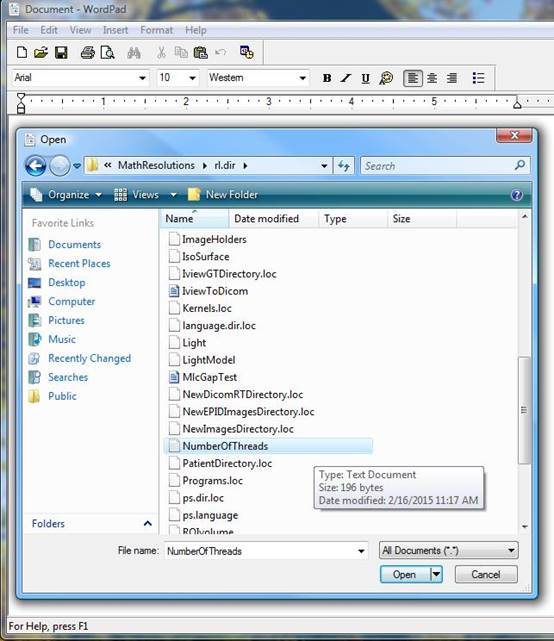
In the “Open” window first select All Documents (*.*) in the drop-down button next to File name:. See picture below:

Then
navigate to the MathResolutions folder. Then
scroll down and select the rl.dir folder. Then
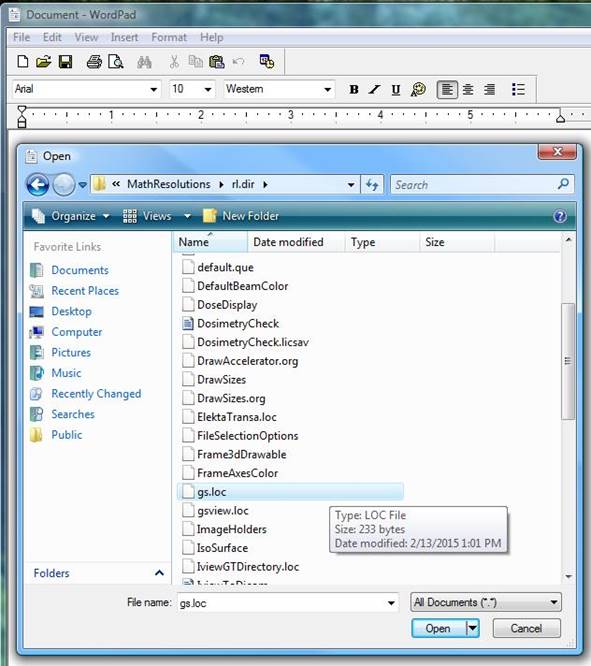
scroll down and
select (double click) gs.loc. This will pull up the
“defined” path for GhostScript in Dosimetry Check.
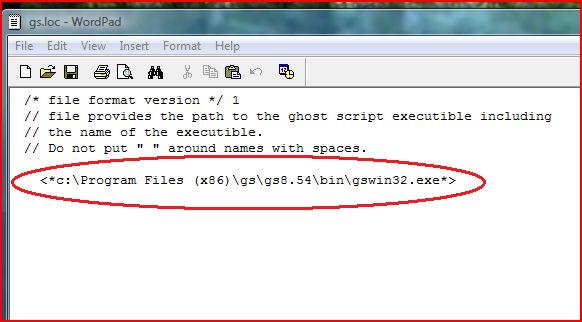
In WordPad, edit the “defined” path shown to match the actual location of GhostScript.
Then go to File and click Save to save the changes that were made.
Note: There is a chance that no changes may be needed.
Step 7. Run Dosimetry Check to generate the Computer ID
Run Dosimetry Check to generate the Computer ID
License Key: When the Dosimetry Check program runs a request for a license key will appear (shown below) after you dismiss a welcome message. Enter the Computer ID that Dosimetry Check generates on the line above. See picture below:
Note: The Computer ID number will be different than the picture below.

Step 8. E-mail LifeLine Software to Obtain License Key
Send
an e-mail message to the Technical Support staff at LifeLine Software,
Inc. The e-mail address is: techsupport@lifelinesoftware.com
In the e-mail, please indicate your institution name and the Computer ID along with the list of products that you need a license key for.
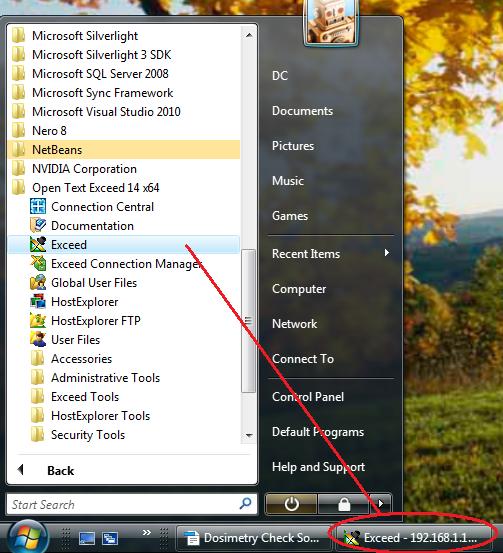
Step 9. Remove Exceed Toolbar (for Windows Vista only)
Remove the Exceed Toolbar so that it will not pop up on the screen and get in the way.
To do this open up Exceed by going to All Programs and double clicking on the Exceed Program. The program should then pop up at the bottom of the screen along the Program status bar as shown in the picture below:
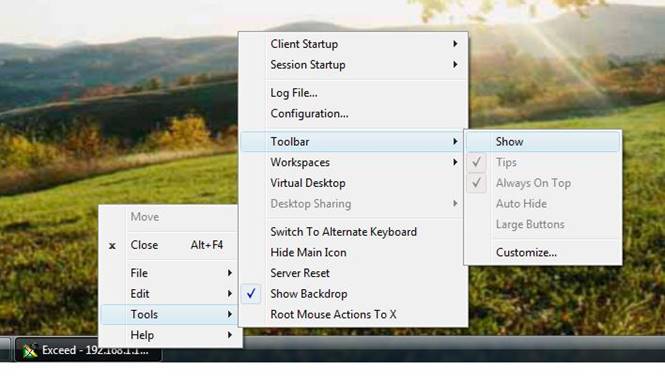
Next, Right Click on the Exceed Program in the Status Bar and go to Tools and then to Toolbar. Under Toolbar UN-click “Show” as shown in the picture below.
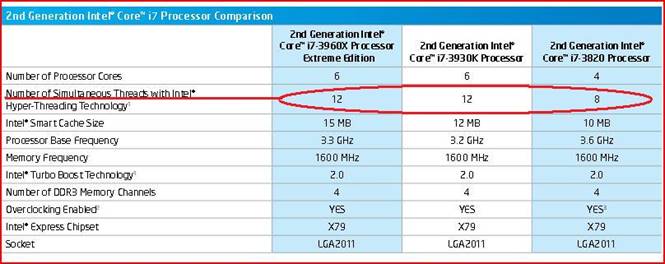
Step 10. Identifying and Setting the number of Threads/Core Processors in Dosimetry Check
NOTE: If you are upgrading Dosimetry Check, then you may skip this step and move on to Step 11.
Determine how many Core Processors or “Threads” the computer has that is running Dosimetry Check. For instance, a computer with an Intel i7 core possessor could have 8 or 12 “threads” depending on the version of the processor. See the below chart for a comparison.
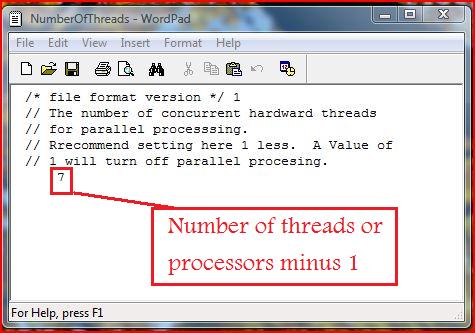
Then using Word Pad enter this number into the file NumberofThreads.
To do this, go to
the Start menu and select All Programs. Then, under
the Accessories folder open up the program WordPad.
When
WordPad is
open click on File and then Open at the top left of the
window. In the “Open” window first select All
Documents (*.*) in the drop-down button next to File name: See picture below:

Then navigate to the MathResolutions folder. Then scroll down and select the rl.dir folder. Then scroll down and select (double click) NumberofThreads.
Once the document is open in Word Pad, then edit the last number to match the number of threads/processors minus 1. For instance: if the computer has 8 threads then enter 7. Then save the document once it is edited. For a 32 core machine, put 31. For 64 put 63. This entry specifies the number of cores that Dosimetry Check will use during a dose calculation.
Important! Don't forget to save.
Exceed Trouble Shooting Guide
a.
Setting the path
variable to Exceed dll’s.
After Exceed, Exceed 3D, and installmotif.exe is installed a problem will occur if the “Install” Programs for each Exceed is left on the hard drive when the Dosimetry Check Install program runs. If that is the case, then the path to those programs will be set incorrectly to the Install programs instead of the actual Exceed Programs themselves.
There are two way to solve this problem:
The easiest way to correct this error is to search for the Install programs for each Exceed (Exceed and Exceed3D) and remove those programs from the hard drive. It is important to only remove the Install programs and not the actual Exceed programs themselves.
Then Run the Dosimetry Check Install program again. This will set to the proper paths to the Exceed programs.
The second way to solve this problem involves using the Command Prompt window to view the current paths and then changing those paths through the control panel.
To view the current system path, type the command "path" into a command prompt window. The result should look similar to below:
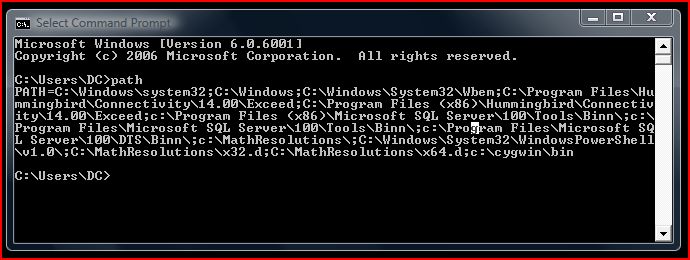
Note: The paths listed will be separated by a semi-colon ;
For 32 bit Computers
There is only 1 path if the computer is a 32 bit system and it should look like this:
c:\Program Files\Hummingbird\Connectivity\nn.00\Exceed
(where nn is the Exceed version number)
For 64 bit Computers
There are 2 paths if the computer has a 64 bit system and they should look like this:
c:\Program Files (x86)\Hummingbird\Connectivity\nn.00\Exceed
and
c:\Program Files\Hummingbird\Connectivity\nn.00\Exceed
(where nn is the Exceed version number)
Note: “nn” in the path sequence is the Exceed version number. In the above picture it is 14.00.
Changing the path sequence
Go to Control panel, then to System, then to Advanced or Advanced System Settings, then to Environment Variables. Then scroll down the System Variables window to find “Path” and then hit edit. See picture below:
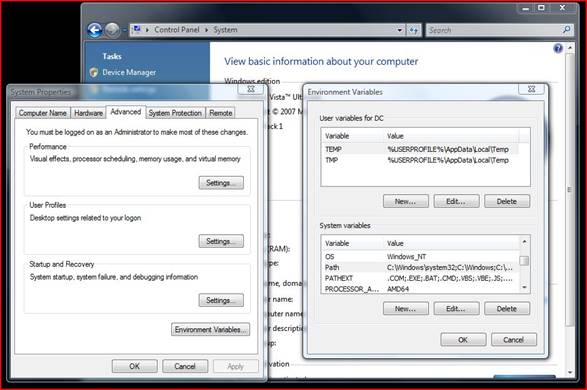
 This is the result:
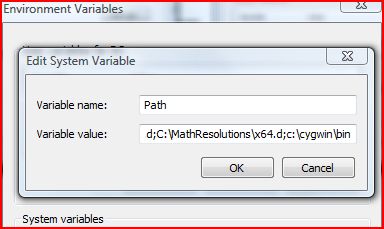
Changing the Path
To change the path, it is necessary to scroll left to right to find the correct path and change it. Paths are separated by a semi-colon. Be careful to only change the paths you need to change. You will have to reboot after making a change.
b. Program X Resource Files
The X server needs to find the program X resource files. This is set by the environmental variable
XAPPRESDIR. Use the SET command in a
command prompt window to see the current status of environmental variables. Our
installer must also set the path to where the X resource files are to be found:
XAPPLRESDIR=C:\MATHRE~1
where MATHRE~1 is the 8.3 file format version of MathResolutions. If this variable is not set correctly, X will not be able to find the X resource files. You can edit the environmental variables just like the PATH variable was edited above.