MillComp
Program to Mill Compensators
On an End Mill
Version 1, Release 2
January 6, 2003
Copyright 2001 by Math Resolutions, LLC.
Compensator
Specification File
Introduction
This program was designed to control an end milling machine to produce compensators from an input specification of the thickness of the compensator along either divergent rays or from a surface specification. An end mill is a machine that has a spinning tool. The tool can move up and down while the work piece sits on a table that can move horizontally. Under program control the tool can cut a path through the work piece. A compensator is a solid material piece, usually made of lead or cerrobend, whose thickness is to vary over the area of the piece. The variation in thickness will result in x-rays being attenuated differently over the area.
System 2100
This program uses the System 2100 library. Refer to the System 2100 manual for details on image display and printer functions.
Milling Codes
This program generates the codes that move the tool. The coordinate system assumed is the z axis is the tool height, and the x,y axis is the table motion. A subset of available codes is used in an attempt to use only those codes common to all milling machines. The codes used are:
G21: metric command, assumes all coordinates are in millimeters.
G40: turn off cutter compensation.
G90: all coordinates are given in absolute coordinates.
M09: turn coolant off.
M05: turn the spindle off.
TnM6: commands the machine to get tool n, where n is replaced with the tool number, and M6 commands the tool change. Some machines need only Tn without the M6. It is assumed that T0M6 will put the existing tool away and leave the spindle without a tool.
G43Hn: load the tool length off set for tool n. Each tool must be calibrated relative to the coordinate system of the milling machine, so that when moving to a given tool height, all tools will have their ends at the same point. Therefore G43H4 should hold the compensation length for tool 4, for example.
G00: move the tool in rapid motion.
M08: turn the coolant on.
M03Sn: turn on the spindle, set the spindle speed to the value given by n, for example, M03S1500 for 1500 RPM.
Fn: set the feed rate to n where n is the value in mm/min. For example: F80.0 for 80.0 mm/min.
G01: move the tool at the programmed feed rate. The movement is on the line from the present x,y,z coordinates to any new point specification. The new point might be a change in any of the x, y, or z coordinates.
M01: end of the program.
The programs will start with a single comment line designating the setup that the program is for. Next follows a % sign. The machine is moved with only the above commands. A % sign ends the program. And example program is:
//Two pieces 6 inch by 6 inch cerrobend.
%
N1G21
N2G40
N3G90
N4M09
N5M05
N1T1M6
N2G00X-90.200Y-4.200Z63.200G43H1
N3M03S1500
N4M08
N5F80.0
N6G00Z63.200
N7G00
N8X-90.200Y-4.200
.
.
.
N21G01
N22Z30.600
.
.
.
N12489G00Z63.200
N1M09
N2M05
N3T0M6
N4M02
%
Notice that the line number starts over again at 1 at a tool change and at the end of the program.
Tool and Setup File
The program needs to read two files describing the tools and blanks, MillTools.dat and MillSetups.dat. These and the compensator specification file use the System 2100 ASCII file standard whereby /* and */ set off comments, <* and *> set off string data.
Both the tool file and setup file is located in the current directory.
Program ConvertRToolFile will read a Render-Plan 3D tool.dat file and write out the below two files.
Tool File
The information about the tools are given in the file MillTools.dat. The tools are listed in the file in the order in which they are mounted in the tool changer, starting with tool 1. The tools may be in any order.
It is extremely important that the tools be properly calibrated in regards to length. An accurate surface will not be cut if a tool has the wrong length offset value stored in the milling machine.
Generally the tools are calibrated against tool 1. The largest ball end is used to cut the surface. Smaller diameter ball end mills are only picked up to work on areas where the larger tool did not fit. If the tool length calibration were incorrect, the other ball end mills would cut too much or too little. A collision between a tool and the emerging surface might also occur if the tool calibration for a tool were incorrect. For example, the scriber tool only penetrates the surface created by the flat end tool a small distance. If the flat end mill or scriber were off, either the scriber would miss the surface or it might collide with the surface.
Tool types are limited to a drill, a counter sinker, a flat end mill, a scriber (which could be a small ball end mill), and ball end mills. An example file is shown below:
/* File format version: */ 1
/* This file contains list of tools in the milling machine. */
/* Next follows a list of the tools in the order in which
they are in on the milling machine. */
/* Number of tools: */ 7
/* Tool types are: Drill, Sink, Flat, Scrib, and Ball */
/* Tool description followed by:
Tool Diameter Reach Max depth Spindle Feed at Feed at Plunge
Type cm cm single cut speed max depth 0 depth. Feed
cm RPM cm/min cm/min cm/min */
<* 1/8 inch diameter drill *>
Drill 0.3175 5.00 0.60 1000.0 0.0 0.0 2.0
<* counter-sinking tool *>
Sink 0.635 2.50 0.40 500.0 0.0 0.0 2.00
<* 1/2 inch flat bottom mill *>
Flat 1.27 2.00 0.63 1200.0 12.00 24.00 1.2
<* Scriber tool *>
Scrib 0.15875 2.00 0.01 4800.0 20.00 20.00 10.00
<* 1/2 inch ball end mill *>
Ball 1.27 2.50 0.63 1530.0 23.00 46.00 2.3
<* 3/8 inch ball end *>
Ball 0.9525 2.50 0.476 2000.0 30.00 60.00 3.0
<* 1/4 inch ball end *>
Ball 0.635 2.50 0.317 3000.0 45.00 90.00 4.5
/* Margin for tool clearance all tools except drill.
This is the thickness added to all paths. in cm */ 0.1
/* The tolerance parameter in cm: */ 0.025
/* Based upon assumption that 0.025 cm cerrobend attenuates 1 % */
/* Useful equations for end mills:
Surface speed per minute (cm/min)
RPM = ---------------------------------------------
diameter (cm) x 3.14159
Feed rate (cm/min) = Feed per tooth (cm) x number of teeth x RPM
Depth of cut should not exceed 1/2 of the end mill diameter (in general).
We know of no good data for lead and cerrobend, and so rely on what works
by trial and error.
*/
The above tool file is self documenting as to the values. We provide additional information below. If any tool is missing, than that operation is not performed. The tool must be listed in the same order that they are mounted in the milling machine, but may be mounted in any order.
Note that all dimensions are given in centimeters. Never lie about a tool’s diameter or reach. These values are needed to prevent a collision.
The reach is the maximum depth which the tool can plunge before there is a collision between the spindle and the work piece. It is normally the length of the tool protruding from the spindle.
For a drill, the depth of maximum cut is the pecking depth. That is, the drill will drill that depth and then retract out of the hole. It will than advance back into the hole to drill more. Only the plunge feed rate has meaning for this tool as the tool is never dragged.
This tool will penetrate the work piece by the radius of the drill. This is the only tool that will go below the bottom of the work piece. All other tools will maintain a clearance height.
For the counter sinking tool, the depth of maximum cut is the depth that the tool will drill down to from the thickness given for the work piece. Only the plunge feed rate has meaning for this tool as the tool is never dragged. The counter-sink tool assumes that the surface is given by the blank thickness. We recommend that you not use a counter-sink operation if you are pouring blanks with cerrobend and do not have a close tolerance on the thickness poured. To omit this operation simply don’t mount a counter-sink tool and omit the tool from the tool file (which must list the actual tools in the same order that are in the tool changer).
The flat end mill is used to mill a pocket into the work piece. The feed rate will vary from that specified at the depth of maximum cut to that specified at a depth of 0. The plunge feed rate is specified separately. Normally the depth of maximum cut should not exceed the tool radius. The tool will cut no deeper than the depth of maximum cut on any one pass. Multiple passes will be used to cut deeper.
The depth of maximum cut for the scriber is the depth that the scriber will be dragged at. This tool will plunge at the plunge feed rate and then drag to cut the lettering for the labels around the perimeter of the pocket. If there is not a flat end mill then the labeling will not be done. The flat end mill is needed to produce a well defined surface for the scriber as well as remove excess material that is not needed.
The ball end tools are used to mill in the compensator surface. The same comments apply as did for the flat end mill above. The program will use the largest ball end tool for most of the cutting and will pick up the smaller tools only if they can cut beyond the tolerance specified in the file.
The margin for tool clearance is the thickness that is added to the compensator. If the compensator is specified on divergent rays, this thickness is added to the divergent rays, so that the perpendicular thickness is actually a little less but only by a very small fraction.
This margin is necessary so that tools (except the drill) do not penetrate into the surface holding the work piece and so that islands in the compensator will not fall out. If specifying the surface on rays perpendicular to the compensator plane so that divergent has all ready been accounted for by the design program, then some consideration must be given to this margin. The design program should design the compensator for a source to compensator distance that has been adjusted by the height of the margin.
The tolerance parameter is the accuracy by which the compensator is milled. A curved surface cannot be milled to infinite accuracy. A ball end mill in making multiple parallel passes will leave a ridge. The parameter specifies the maximum height of that ridge. Subsequent ball end mills will make passes only if they can cut more than this tolerance parameter. This number cannot be set to zero. We recommend that you mill to within one percent transmission of the material being used. Making this parameter smaller will increase the milling time.
If any type of tool is missing from the tool changer list, than that operation will not be performed. It would not make sense to omit the ball end tools because then the surface could not be milled. The tools may be mounted in the tool changer in any order, but must be listed in the tool file in the same order as they occur in the tool changer.
Blank Setup File
The location of the working pieces is specified in the file MillSetups.dat. There may be unlimited setups on the milling machine, each consisting of one or more blank locations. For each blank must be specified the coordinates of the bottom center of the blank relative to the milling machine coordinates. The number of holes and location of each hole are specified for each blank. The hole locations are relative to the bottom center of each blank, not to the milling machine.
The thickness of all blanks for all setups is specified with a single parameter. If this number is zero, than the program will prompt for the blank thickness for each compensator after displaying the thickness needed for each compensator (see below).
It is extremely important that the blank not be thicker than that
specified to the program. Collision and
severe damage to the milling machine can result if there is in fact solid
material where the program assumes there is air.
If you are pouring cerrobend, you can type in the thickness for each compensator once you know the thickness required. After the milling file is created you can print a report and use that to guide the pouring of each blank. However, it seems to us that using the program this way creates the possibility for error if someone were to put a thicker blank in place of a thinner one on the milling machine.
We recommend that instead you specify the maximum thickness blank that you will pour in the MillSetups.dat file and never pour a thicker blank.
You can pour a thinner blank with the program assuming a thicker blank. All that will be lost is the time taken to mill air down to the actual blank thickness. But this may be better than risking a collision someday.
For each blank is specified the working area. This is the dimensions of the square area available for the compensator surface. The tools will not go outside of this area except for drilling the holes. For each hole, the tool will move from the center of the blank directly to the hole. The tool will be lifted to the clearance height above the bottom of the blank for the move to the hole. The clearance height must not be beyond the height limit of the milling machine and must be high enough to clear any clamps if the tool passes over a clamp from the center of the blank to a hole location.
In the file the number of setups is specified. For each setup the number of blanks is specified followed by an entry for each blank. The program will pick the setup with the smallest blank that will hold the compensator. It will mill however many compensators it can with that setup. Each output file will mill only one setup but possibly more than one blank in the setup (if the setup has more than one blank). A printout will be produced that list the file name produced, the setup used, and the blanks milled in that setup.
An example MillSetups.dat file follows:
/* format version: */ 1
/* This file contains a description of the blank size and
setups available on the milling surface */
/* Thickness of all blanks cm. */ 2.0
/* clearance height in cm */ 5.0
/* number of setups: */ 2
/* setup number 1 */
<* Single 8 1/4 x 8 1/4 inch cerrobend.*>
/* number of blanks */ 1
/* square work area size in cm */ 20.0
/* x,y,z coordinates of bottom center of the blank, relative to the
touch off point, cm */ 0.0 0.0 0.79375
/* number of mounting holes to drill */ 6
/* x, y coordinates of each hole in cm relative to center of blank.*/
10. 10.
-10. 10.
-10. 0.
-10. -10.
10. -10.
10. 0.
/* setup number 2 */
<*Two 5 by 5 inch cerrobend blanks.*>
/* number of blanks */ 2
12.0 6.0 0.0 0.79375 4
5.8 5.8
-5.8 5.8
-5.8 -5.8
5.8 -5.8
12.0 -6.0 0.0 0.79375 4
5.8 5.8
-5.8 5.8
-5.8 -5.8
5.8 -5.8
Compensator Specification File
The compensator is specified in the file format shown below.
Render-Plan 3D input.
Program RPtoMillComp will convert Render-Plan 3D compensator files to the below format.
If the milled surface is to face the patient, in Render-Plan 3D software select the surface to face the source of x-rays and accomplish the flip with the program RptoMillComp provided here. The specification below is always in BEV orientation. MillComp accomplishes the flip. You do not want Render-Plan to reverse the data across the Y axis as it will no longer be in BEV orientation.
MillComp file format.
Care must be taken when this file is written. The compensator is to be specified in beam’s eye view coordinates, not milling machine coordinates. If the milled surface is to be facing the patient, this program will flip the beam’s eye view to the milling machine system. This involves a rotation and expansion of coordinates on divergent rays instead of a contraction. This file may be in the current directory or the user may navigate with the file selection box to the location of the file.
Orientation labels should be supplied for the compensator.
The orientation labels are safety features. They provide a means to visually inspect the compensator at the time it is used as to the proper orientation relative to the patient, and as to using the correct compensator with the correct treatment field.
There is a label for each side of the compensator. The order of the labels in the file are: patient name, hospital name, treatment machine name, compensator name, minus beam’s eye view x axis identifier, plus x axis identifier, minus y axis identifier, plus y axis identifier. These labels must be correct for correct application of the compensator. For a head first supine patient with the collimator in its unrotated position, the minus x beam’s eye view side would be to the patient’s right. The positive y beam’s eye view side would be toward the patient’s head (superior).
Like the compensator, the labels are specified in beam’s eye view coordinates. If the milled surface is to face the patient, this program will rotate the compensator and labels so that the surface is presented on the top side for milling.
Note that the user can edit the labels as describe below.
Another issue is that the location of the center of the compensator array is located in beam’s eye coordinates and must be correct. The compensator plane to source distance must be correct for divergence to be correctly accounted for. The actual size of the compensator is given in the plane where the compensator is mounted. The size is defined by the spacing between array points and the dimensions of the array. If the compensator plane were to be specified at the wrong distance, it will not modify the x-ray field as planned.
A final issue is the maximum thickness of the compensator.
If the specification calls for a thicker compensator than can be
milled, the compensator will be truncated with the higher elevations missing.
It will be as if the top part was sliced off and thrown away. This is a design issue beyond the scope of this software. It is important that once the maximum thickness that can be milled is decided upon, that the design methods be reviewed to see if that limit can be enforced in the design process.
An example compensator specification file follows:
/* file format version: */ 1
/* File for milling machine compensator specification. */
/* Patient name: */ <*John Doe*>
/* Hospital name: */ <*Memorial Hospital*>
/* Machine name: */ <*6 MeV accelerator*>
/* Compensator name: */ <*left obl*>
/* Minus X axis identifier: */ <*right*>
/* Plus X axis identifier: */ <*left*>
/* Minus Y axis identifier: */ <*inferior*>
/* Plus Y axis identifier: */ <*superior*>
/* location of the center of the grid in beam's eye view coordinates, x,y in cm: */0.000 0.000
/* distance to the source of x-rays in cm */ 56.300
/*
1 = elevation on divergent ray, milled side toward source of x-rays.
0 on perpendicular ray, milled side toward source of x-rays.
-1 = elevation on divergent ray, milled side toward patient. */ 1
/* dimension of grid in x direction: */ 20
/* dimension of grid in y direction: */ 10
/* spacing in grid in x direction in cm: */ 0.45
/* spacing in grid in y direction in cm: */ 0.45
/* the grid elements in cm, x axis fast, y slow,
x minus to x plus, from y minus to y plus*/
1.032 1.110 1.152 1.208 1.194 1.176 1.182 0.920
0.928 0.898 0.890 0.692 0.664 0.660 0.502 0.490
0.456 0.336 0.152 0.000
1.190 1.186 1.228 1.234 1.192 1.210 1.082 0.968
0.944 0.914 0.878 0.778 0.764 0.820 0.704 0.582
0.688 0.494 0.332 0.150
.
.
.
If any of the text fields are too long, the remaining characters will simply not be milled.
The orientation labels are centered along the edges of the compensators. The other four labels start at an edge, and will skip over the orientation labels if necessary.
There may be more than one compensator in a file. Simply repeat the above starting at the first label (the patient’s name).
CadPlan-CadMill input.
This program will read in compensator files written by CadPlan. The present format version is CP1 which is indicated in the file extension.
Do not attempt to read in a different format. Unknown results and errors could result.
The file selection box will come up with the filter *.CP1 which will display all files that end in “.CP1” in your current directory. Select the file you want to mill (see more on the file selection box below). Note that case matters and you should store your files with the extension in upper case. If not, you can change the filter to lower case.
A patient name and compensator ID is provided in the file. Otherwise the orientation information which MillComp can mill around the perimeter of the compensator is not provided in the file. You will have to enter the other labels in the popup tool provided for that purpose as described below.
CadPlan provides the thickness of the compensator on orthogonal coordinates, not on divergent rays. MillComp can only reproduce the surface as so specified. The number of rows and columns is provided in the file format, with the actual points listed as x,y,z triplets. The expected order is x minus to x plus, followed by y minus to y plus. If these points are not provided in this order and on a regularly spaced array, an error message will be displayed and the file rejected for milling.
Running MillComp
Type MillComp in a winterm.
MillComp ToolBar.
On the main window select the “Select Compensator File” pulldown on the main toolbar to select a compensator design file.

The mill program main tool bar.
Read in compensator file.
A file selection box will be displayed.

File selection box.
You can navigate to a different directory by making selections in the left side under directories, or type in the directory in the filter field. An * may be used to select all file names for viewing on the right side, or you may restrict the file names to be displayed with the filter. Select the file on the right side and then hit the OK button.
Surface display.
Each surface will be displayed in a separate screen in a single frame. Select as many compensator files as desired. On the right you can reselect which compensator surface to view.
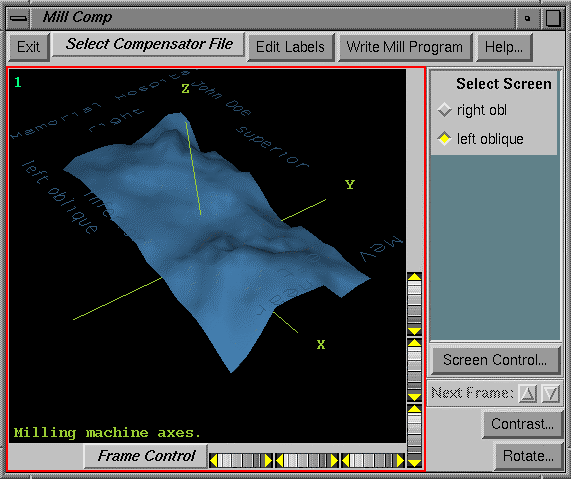
The main screen for MillComp
See the System 2100 manual for a description of the viewing system and user interface. Only three dimensional room views are provided here.
Hard copy.
If you want to print a picture of a compensator surface, click the mouse inside the frame and then hit the Print Screen button on your keyboard. See the System 2100 manual for further details.
Enter blank thickness.
If the blank thickness parameter in the mill setup file (see above) is zero, the program will display the maximum thickness of the compensator and prompt you to enter the blank thickness.
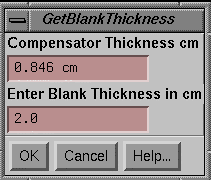
Blank thickness prompt.
Edit orientation labels.
For the current compensator being viewed, you can edit the orientation labels. Select Edit Labels to get the edit labels popup tool.
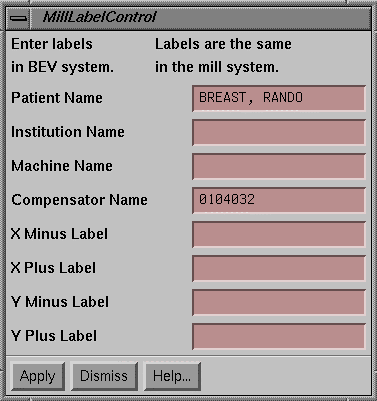
Edit Label Tool.
The compensator is displayed in the milling machine coordinate system with the milled surface toward the positive Z axis. The cutting tool on a three axis end mill is above the work piece. The orientation labels are in reference to the beam’s eye view (BEV) coordinate system. If the milled surface is toward the source of x-rays, the two systems are the same. If the milled surface is toward the patient, then the mill coordinate system is rotated around the Y axis from the BEV system. The top of the edit label tool will indicate whether the two systems are the same or not or if the milled system is flipped. You can rotate the room view of the compensator surface so that you can read the labels for verification of the correct position.
You must be sure the orientation labels are correct as they serve as a safety feature for those who apply the compensator to the treatment of a patient.
This will require you to be familiar with the intended orientation of the compensator. Remember also that the beam’s eye view coordinate system rotates with the collimator.
Write milling machine file.
Next hit the “Write Mill Program File” button to write out the milling machine programs for the selected design files. The program will write one or more files out. Each file will be for a single setup since all the blanks in a single setup are milled as one single job. As each compensator is milled, its surface will be deleted from the display. If for some reason a compensator cannot be milled, the surface will remain. Error messages will be popped up and written to standard out. The files go to the temporary directory specified in the program resources directory (see the System 2100 manual).
A report will be displayed showing the files produced, the blanks milled in each file, and the thickness of the compensators in each blank. The total tool path and milling machine time will also be displayed for each blank.
Milling
The program is designed so that the ball end tool never removes too much material. If a valley is too narrow for the tool to fit, it will only cut until the tool touches the surface at some point. Smaller ball end mills will be selected if they can cut the surface somewhere. For the low gradient surfaces usually involved with compensators this should not be a problem. However, the importance of using a verification technique such as program Dosimetry Check (see below) should not be dismissed.
Monitor Unit Calculation
The monitor units to be used for each field must be corrected for the transmission through the compensator. The milling process will add a margin to the bottom of the compensator which will decrease the transmission. The transmission should be measured on the same ray that the monitor units are computed on. The application of the compensator involves issues beyond the scope of this software but we need to point out the need for care nonetheless. If the central tray were to go through lung and the compensator made to correct for lung transmission, than lung transmission should be accounted for in the monitor unit calculation. Otherwise the dose around the lung would be raised instead of the lung dose lowered.
It may be appropriate to measure the thickness of the compensator instead of measuring the transmission along some ray (usually the central ray). However, be aware that scatter off the compensator can change the in air scatter collimator factor from that expected for an open field with the same collimator opening. Measurement on the treatment machine for the correct energy with a dosimeter will be more definitive and accurate.
Dosimetry Check
After making the compensators the dosimetry should be checked with program Dosimetry Check.
Dosimetry Check is a comprehensive treatment verification procedure available from us. Download the treatment plan in RTOG format, or otherwise read in the CT scans and set the beam positions. Shoot each field with the compensators and all other treatment fields and compute the dose and dose distribution with Dosimetry Check.
If Dosimetry Check cannot be used because there is not a CT based external beam plan, than extra care must be taken to ensure the correctness of the compensator. The milling machine itself can be used to touch off specific points with the coordinates read and compared. With this means the thickness at strategic points can be checked. Other means of verification might include taking a film with the compensator and comparing its transmission to the design transmission.
References
1. Renner, W.D., "A Photogrammetric Technique for Use in Radiation Therapy." Photogrammetic Engineering and Remote Sensing, Vol. 43, No. 5, May 1977, pp. 581-591.
2. Renner, W.D., O'Connor, T.P., Amtey, S.R., Reddi, P.R., Bahr, G.K., Kereiakes, J.G., "The Use of Photogrammetry in Tissue Compensator Design, Part I and II." Radiology, Vol. 125, No. 2, Nov. 1977, pp. 505-516.
3. Renner, W.D., "Photogrammetry Applied to Radiation Therapy." Treatment Planning, Vol. 6, No. 3, June 1981, pp. 10-17.
4. Renner, W.D., "Tissue Compensators." Treatment Planning, Vol. 7, No. 1, Feb. 1982, pp. 4-8.
5. Renner, W.D., O'Connor, T.P., Bermudez, N.M., "An Electronic Device for Digitizing Radiotherapy Films for the Construction of Tissue Compensators." Medical Physics, Vol. 9, No. 6, Nov/Dec 1982, pp. 910-916.
6. Renner, W.D., O'Connor, T.P., Bermudez, N.M., "A Note on Designing Tissue Compensators for Parallel Opposed Fields." Medical Physics, Vol. 10, No. 4, Jul/Aug 1983, pp. 483-486.
7. Renner, W.D., Pugh, N.O., Berg, R.E., Kent, J.S., Frost, S.V.,Palamara, R.D., "Automated Production of Patient Compensating Filters." Treatment Planning, Vol. 10, No. 1, 1985, pp. 33-35.
8. Renner, W.D., O'Connor, T.P., Bermudez, N.M., "An Algorithm for Design of Beam Compensators." International Journal of Radiation Oncology, Biology, Physics, Vol. 17, No. 1, July 1989, 227-234.
9. Cantwell, J.P., Renner, W.D., O'Connor, T.P., Bermudez, N.M. “A Dosimetric Comparison of Three Compensator Design Methods for the Mantle Field.” Medical Dosimetry, Vol. 14, No. 4, 1989, 257-263.