IsoSurfaces
An isosurface
is created by considering the stacked image set to be a three dimensional array
of numbers. Each number is the pixel
value of an image that makes up the image set.
We can specify a value and find the surface the separates regions less
than the value from regions greater than the value. The three dimensional surface is analogous to contour lines on an
elevation map, where the contour lines are on a constant elevation and divide
higher elevations from lower elevations.
An isosurface is also referred to as a constant level surface. At this time we do not bit map the
isosurface and so cannot refer to its volume.
In
this implementation we have restricted the isosurface generation to the images
shown on a screen. If the screen is
that which displays all the images of a stacked image set, than the isosurface
is made from the entire image set.
However, one could put select images on another screen and generate
isosurfaces from just those images. The
process uses only images that are in parallel planes. For example, one could reformat a series of coronal images on a
separate screen and generate an isosurface from that.
To
access isosurfaces, go to Contouring on the main tool bar and select
Isosurface. On the isosurface tool bar,
there is an option menu on the right that allows one to select an
isosurface. The items on the IsoSurface
pulldown that is between the option menu for selecting the image set and option
menu for selecting an isosurface, pertain to the currently selected isosurface
in most cases.
On
the IsoSurface pulldown select New IsoSurface to create a new isosurface. The color defaults to gray. Specifying a name, color, material
properties, a description, are similar to that for outlined volumes above and
so we will not repeat that material here.
Likewise Frame Control and selecting active or inactive are the same
except that an isosurface is not drawn in 2d images and so the 2d control has
no effect.
Select Isovalue Popup
|
Specify Isovalue Popup |
To
create an isosurface you must specify an isovalue. The value we select is the voxel value for the image set. Typically for CT, the Hounsfield number for
air (-1000) corresponds to 24, water
(0) to 1024, and Hounsfield +1000 to 2024.
Simply add 1024 to the Hounsfield number to get the pixel (voxel) value
actually stored.
On
the IsoValue pulldown select Select Isovalue.
A popup appears whose controls we describe below.
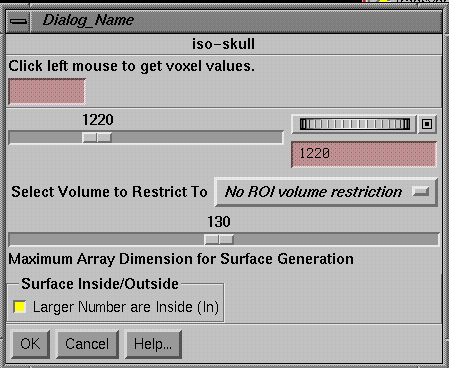
Voxel Value
You
can find the value of any voxel by simply clicking the mouse on any image in
the current image set that you have selected.
We simply show the value at the top of the Select IsoValue popup.
Select Isovalue
You
may then select the isovalue that you want to use by either sliding the scale,
or adjusting the wheel for finer control, or by typing in the value in the text
field provided. When typing in, you
must hit the Enter key after entering the number you want.
Volume Restriction
You
may restrict the surface found to that within a volume that you have outlined. For example, if you want to see a lung
isosurface (using CT), select an isovalue in the range of 300 to 800, but
restrict to inside the body surface outline.
Otherwise, you will also pick up the body surface since it also borders
between values of the order of 1024 and 0.
For bone you usually need not restrict the surface to any volume. You may have other reasons to restrict the
surface to that within some outlined volume.
The
restriction is to the interior of the outlined volume, but also excluding those
voxels that are in but on the edge of the volume. If you later delete the volume selected, you won't be able to
regenerate the isosurface restricting to that volume since the volume would now
be gone. Any further changes to the
restricting outlined volume will have no effect upon the currently generated
isosurface. You would have to delete
the isosurface and regenerate it if you want a change in the restricting volume
to effect the isosurface.
Maximum Size Array Dimension
Another
consideration is the maximum array dimension allowed. If your images are 512x512 for example and this value is set at
130, then the image data will first be reduced to 128x128 by averaging pixels
and then an empty row of pixels is added to all sides to make the final result
130x130. Increasing this value will
greatly increase processing time, drawing time, and memory used by the
system. Averaging down the image size
will reduce details however. Further
reductions in resolution occur with the generation of more than one set of
surface triangles, and the result that is drawn in a window will depend upon
the size a triangle will project to on the screen. You have control of that in Frame Control. A surface rendering algorithm is used to
generate an isosurface. The surface found
is saved to disk and retrieved when you retrieve the image set.
Select Inside/Outside
For
lack of a better place, we put a control here for the definition of what is the
outside surface of an isosurface. For
bone with CT the larger number would be on the inside, whereas for lung, the
larger number would be on the outside.
You can change this choice at any time, and it takes effect immediately
if the surface is all ready generated.
The OK and Cancel buttons below have no effect and do no apply to the
status of this choice.
OK to Proceed
When
you hit the OK button the program will proceed to generate the isosurface for
the images of the selected image set on the current screen you are looking
at. Normally you would pick the screen
that shows all the images of the image set.
However, you may create and use some other screen. However, the program can only use images
that are coplanar. If more than one
group of coplanar images is found on the screen, the program will simply use
the group with the largest number of images.
We do not believe any further sophistication is necessary as you are in
control of building the screen.
If
none of the parameters have changed since the prior surface was generated, the
algorithm will not be run again, regardless of any change in the screen. You can change the isovalue by a single
digit if you are effecting some change in the images used and want to force a
new surface generation. If the
restricting volume has been changed, than a parameter has been set accordingly
to generate a new surface upon hitting OK.
Cancel
Cancel
will simply pop down the popup without anything happening.