Main Screen
The
program runs within single a window which displays a tool bar across the top of
the window, and screen selections down the right side of the window. Additional pop ups are utilized for functions
that are called from the tool bar but need a larger area. Most of the area is devoted to displaying
images. You may resize this window
anytime you want. The button at the
extreme top right on the window frame (for the X windows system) will maximize
the window to fill the screen of your monitor.
System 2100 provides the imaging functions for other programs which are
added under the Applications (Plans) pull down.
The
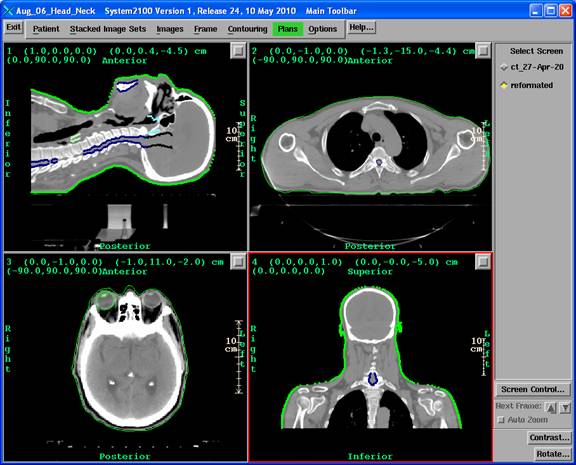
title bar of the main application window shows the selected patient’s name on
the left, here “Aug_06_Head_Neck”, in the example below. Next is shown the name of the program
followed by the version of the program including the assigned date of the
program. The name of the current toolbar
is shown to the right of the version.
|
The Main Screen |
The
area under the tool bar and to the left of the Select Screen area where images
are display is referred to here as a screen.
Each screen may be divided into frames.
Each frame may contain either a 2d image or a 3d view. There may be multiple screens which are
selected under the Select Screen control.
A set of screens belongs to a screen set. Some future applications may have multiple
screen sets.
Main Tool Bar
The
main tool bar is the one you see when you start the program upon typing
System2100 in a terminal window. The
tool bar consists of push buttons and pull down menus. The main tool bar is at the bottom of the
stack of tool bars. Some selections from
the main tool bar will cause the tool bar to be replaced with a new one. The new tool bar will always have a return
button at the extreme left. Hitting this
button will return to the prior tool bar.
The main tool bar has an exit button at the extreme left which will exit
the program.
Always exit
the program by way of hitting the Exit button.
The
program needs to remove a lock on the directory of the patient you are working
with. If the program is terminated
abnormally, you will have to manually
remove the lock on the patient’s directory that you were working on by deleting
the file rlLockFile in the patient’s directory before you can access this
patient again.
Access
to all available functions is available by selecting one of the options on the
main tool bar. Either another tool bar
will replace the existing tool bar, or perhaps a popup will appear. Many of the pop ups will have a Transparent
toggle button if overlay planes are supported on the system. The transparent button when on will make the
background of the popup see through.
This may be useful when it is desirable to see the effects of some
action on underlying images. However,
the transparent popup cannot be clicked through. The transparency is accomplished by putting
the popup into overlay planes. If the
computer graphics system does not have overlay planes then the transparent
button will not appear. Another
advantage of using the overlay planes is that redraw events are not created
under the popup when the popup is dismissed or moved. As there is typically only four planes in
the overlay planes, images cannot be placed in the overlay planes and those pop
ups will use the image planes, at least for the image.
Select Screen
As
screens are created, a button will be created for each screen on the right side
of the main window. The control is
called a radio box in that only one button may be selected at a time. Pushing a button with the mouse will select
the screen. A label is included for each
screen beside the screen’s button. If
there is not enough vertical room to show all the screen buttons, than the
buttons will be shown in a scrolled window.
Each
stacked image set will automatically create a screen to hold the images of the
screen set. You may create additional
screens with the Screen Control button.
Screen Control
|
Screen Conrol Popup |
Pushing
the screen control button will bring up a popup that allows you to create a
screen, or change the layout of the screen presently being viewed. You cannot delete the screen for a stacked
image set, but you can change its layout (but you cannot reduce the number of
frames). You can delete screens that you
created.
You
can specify the number of frames for the screen you create. If there are more columns than rows of
frames, than the screen is shown in a scrolled area with a scroll bar that will
allow you to scroll through the frames.
For any screen you create you should specify a label to help you
remember what is under each screen button.
Next Frame
When
the image area consists of more than one frame, in the upper right hand corner
of the frame is a button. Hitting this
button with the mouse will cause that frame to occupy the entire image area of
the window. When a frame is enlarged to
cover the entire image area the arrow buttons can be used to step to the next
frame. The up arrow button goes to the
next frame to the left and then up a row, progressing to the next smaller frame
number. The down arrow button progresses
to the right and down, to the next larger frame number. This control is grayed out when a frame is
not full screen. Under the Arrow buttons
is a Auto Zoom toggle button. If the
Auto Zoom is in (selected), than while stepping through the frames of a screen,
the zoom and center of the present frame will be applied to the next frame.
Contrast
For
any selected frame with a 2d image, you may adjust the contrast. To select a frame, click the left mouse
button in that frame. The border of the
frame will change to a contrasting color (red, unless someone has changed it in
the X resource file System2100Res). Than
push the contrast button. The contrast
control will appear which is explained further in the chapter on Image Display.
Rotate
For
any frame with a 3d room view, hitting the Rotate button will bring up a popup
with additional controls for controlling the point of view and the lighting
used in the view.
The Applications Pull down
This
is the socket provided for adding functions to the program for those who are
using this program as a foundation for building their own application. One item on the pull down, X/Motif widget
name UserApt1, is provided for the socket.
Future applications built on top of this product will have entries under
this pull down.
The Options Pull down
Selectable
program options will appear on this pull down.
At the present the only option here is an option to choose a different
printer que to submit print jobs. For
each available printer que, program resource files must have been set up.
Help Button
You
will see a Help button on many of the toolbars and pop ups throughout the
program. They will provide help on the
specific area of the program where the button is found.
Resizing the Window
The
program supports resize events. You can
resize the main window any time that you want.
In X windows, the window frame on the upper right hand corner holds the
maximize button that will maximize the window to cover the screen of your
monitor. The button is square in shape
and is a toggle button. Pushing the
button in maximizes the main window of the application. The window can also be resized by dragging
the resize handles on the window frame.
Those pop ups that contain images and scrolled text areas can be resized
as well. If a popup holds a slider,
resizing the popup so that the slider gets longer will increase the sensitivity
of the slider.
Key Board Traversal
X/Motif
programs supports key board traversal.
That is, you can get at the buttons, pull down menus, and other controls
using only the key board. If you hit the
tab key you will see key board focus moving around the controls. The control with the focus usually will
display an extra outline around the control.
Within a tab group, the arrow keys will move from button to button. For example, the arrow key will move from the
Exit button to the Help button because those two buttons are in the same tab
group. When the Contrast button has the
keyboard focus, the arrow key can be used to move to the Rotate button.
An
exception is the menu bar, which holds pull down menus. The F10 key will jump you into or out of a
menu bar. Within the menu bar you use
the arrow keys to move among the pull down choices. Hitting the space bar will drop the pull
down. Again the arrow keys are used
navigate up or down the pull down menu and the space bar will select an item.
If
you see a character underlined on the label of a pull down menu or on a
particular item, than there exist a short cut method to get to that item. On the pull down labels, holding down the ALT
button and hitting the character will select that pull down (if nothing is down
just the letter key will select it).
Within the pull down menu, hitting the letter on the keyboard will
select that item. This function is case
insensitive.
Use
control tab or shift Tab to get out on a text field. Shift tab will traverse the interface in the
opposite direction.
Each
frame that contains an image is also a control that can receive keyboard
focus. These areas must be enabled to
receive keyboard actions as that is the method by which the Print Screen key
works to allow you to make a hard copy of an image. However, when transversing the main window
with the tab key, focus will go through all the frames row by row as you hit
the tab key. Keyboard focus is not shown
visually in the image frames (but note below that you will see a change while
hitting the tab key). The highlight
outline marks the current frame, not the frame with keyboard focus. This is why you will usually have to click
the mouse inside a frame for the Print Screen keyboard button to work for that
frame; it is to make the window where the image is shown the current window to
receive keyboard events, not to make the frame the current frame in this
application.
To
avoid having to circulate through a large number of frames, use Shift Tab to
circulate backwards to get to some other user interface component.
However,
we will make each image frame the current image frame when it receives keyboard
focus. So while you are hitting the Tab
key you will see each image frame become current (and the prior frame will turn
off its highlighted border). The point
is however, that the highlighted border is not turned off when some other user
interface component, such as a push button, receives keyboard focus. The highlight around a frame is to show which
frame is the current frame in the application.
It can and will be on when some other window (that is not another image
frame) has keyboard focus.
Keyboard
traversal is not supported for any controls you see inside a frame holding an
image. To send a frame to full screen
you must hit the button on the upper right hand corner with the mouse. The same applies to any control button that
might appear in the lower left hand corner of an image frame.
Labels on the Image Frame
Each
image frame will be labeled with a frame number in the left upper corner. For 2 dimensional images, coordinate
information will appear for images that are part of a stacked image set. The normal vector will be shown to the right
of the frame number label. To the right
of the normal vector is the coordinates of the center of the image in table top
IEC coordinates. Below on the next line
will be the spherical coordinate angles for the normal vector, (theta, phi,
twist).