Printing Images
|
Print Screen Control |
To
print an image on the printer, use the P (p) key on the keyboard, or the Print
Screen button on the key board. Or hit
the S key on the keyboard to capture the main application window. It is important that you click the mouse
first on the frame that you want to print.
This includes image frames on pop ups.
Clicking the mouse insures that the window in the frame has keyboard
focus. The P or Print Screen key will
then copy the image area of the window. The
Print Screen Key might do other things, so the P key is better to use. The S or s key will capture the main
application window only if the user interface and images are all 24 bit true
color. This is a what
you see is what you get function. The
resolution and image size is that when you hit the P, Print Screen, or S
key. You might want to make the frame
bigger before doing so, but that will also make for a larger image file. The image file is stored in Silicon Graphics rgb format. SGI
utilities, such as imgview and imgcopy
can read the file produced here.
However, in general this program cannot read rgb
files produced by other SGI utilities because those images may be stored in a
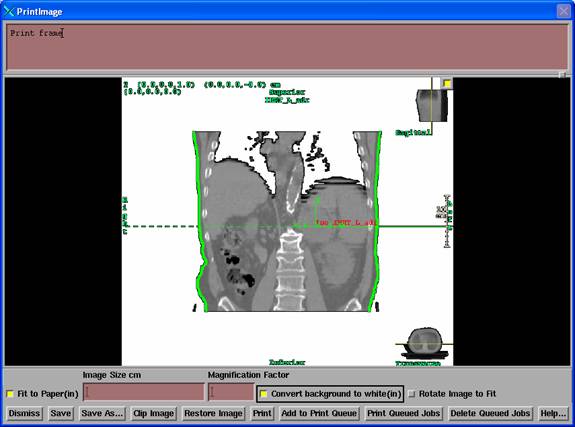
compressed format which is not used or supported by this program. The print image popup may be resized, whereas
imgview will not resize an image. When printed, the image will be sized to fill
up the paper. A header with the patient’s name is added at the top of the page.
Comment field.
Note that a text area exist for making comments on the image. The comments will be printed at the top of
the page below the header and above the image.
On the popup note that the comment area and image display area are
separated by a paned window. You can
change the proportion in addition to resizing the window. However, the resolution of the image is
limited by the size of the window that the image was copied from.
Scaling the image.
The
default is to scale the image to fit the page.
The top of the page will contain a header with the current date and time
stamp, the patient’s name, and other information. Below that follows the comment text. If enough is left of the first page the image
will be placed on the same page. By
unselecting the “Fit to Paper” button, the user can specify the magnification
of the image. For planar images, such as
a CT or MRI slice, the choice is to type in the magnification factor with 1.0
being life size, 0.50 being half life size.
For projected images, the image size is specified in terms of the source
to detector distance. Choosing a shorter
distance will result in a smaller image, a larger distance a larger image. For 3d solid model views, the source is the
eye location and the image plane can be thought of as the window being
viewed. For radiographs, the source
detector distance determines the image size.
If the type of image cannot be determined, than the
default is to specify the magnification relative to the original size of the
image. This default would be
taken if the source to film distance were not known for a radiograph, for
example. The image size on the paper is
shown for the selected magnification.
Otherwise the program will size the image to fit. If the user is specifying the magnification
and the image will not fit on one page, then multiple pages are used with the
image split between the pages. For
capture of the application window, there is only the option of fitting to the
paper automatically.
Clipping the image.
You
can select an area of the image to be printed.
With the mouse click on a corner of the area you are interested in and
drag to an opposite corner. A box will be drawn as you drag. Hitting the Clip Image button will display
only the area inside the box. Only that
area will print. Hitting the Restore
Image button will put back the entire image.
Removing background black.
Pushing
the remove black button will remove black for all black areas that touch a
border of the image, and replace with white.
Areas inside an image, such as lung in a CT scan will not be
affected. A black border is left
touching all non-black areas. This feature is strictly for saving ink with ink
jet printers. You can deselect this
feature and return to the original image.
What is seen on the screen is what will be printed.
Rotate Image To Fit
This
toggle button (select in) will allow the program to rotate the image sideways
on the paper if it would fit better there (wider than high image). However, if
you only view the resulting PDF file (below) you might not want images
rotated. By default rotation is off.
Post Script printers.
This
program only supports Post Script printers, but as a
alternative below, GhostScript can be called
automatically to convert a Post Script file to a PDF, where the PDF may be used
as a pre-print preview and for entering a print job into the computer operating
system’s printing system (Windows). The
page will be formatted in Post Script. If you have more than one printer, than it is possible to choose
which printer to print to. The
program resource files must have been set up to include the printer queues
available. Select Printer under the Options
pull down on the main menu. A tool bar
is pushed that includes an option menu that you may select the printer queue
name with. Once you have made a
selection, any future print job will go to that queue.
Non-Post Script Printers
Use
Gsview or the Adobe Reader (Evince on linux) as a print preview and print from the viewer (see
Print Preview below).
PDF file viewer
You
may choose to convert your print jobs to PDF format. In this case GhostScript
will be called to convert the Post Script file to PDF format and a PDF viewer
will be called to display the resulting PDF file. Set the print que
name to UseAdobe.
May 2012 change: Once the pdf file is
successfully created, the Post Scrip file will be deleted.
Print Preview
You
may choose to use Gsview as a print preview, or a PDF
reader. Set the print que name to gsview or UseAdobe respectively.
In either case, you can print from the viewer to non-Post Script
printers. On Linux a pdf
viewer must be available. On Windows,
the default PDF viewer will be called.
Print Button
Hitting
the print button will send the print job immediately to a printer or printer
system. A Post Script file is written
out in the temporary directory (see below next item).
Add to Print Queue
Hitting
this button will queue up print jobs within the program in a single Post Script
file. By default the file is in the
temporary directory located by the tmp.dir.loc file
in the program resources directory (located by the rlresources.dir.loc
file in the current directory). However
this has been changed as indicated below.
PatientReports.loc file
June
2012 change: A file called PatientReports.loc in the program resources directory will
specify where patient reports are to go.
The file has the format:
/* file format version */
1
// reports go to patient folder, put 1
// reports go to the below directory, put
2 (next line)
/* 1 or 2 */ 1
// alternate location if
above is 2
<*c:/home/Reports.d*>
If
a patient has been selected and the reports are to go to the
patient directory, then the files will be created under the patient directory
in a sub-folder called Reports, followed by a folder made of the current date
that the print file is created. For RtDosePlan and DosimetryCheck,
printing called from a plan that is specific to the plan will be in a further
sub-folder made from the name of plan. Nothing
will be printed until Print Queued Jobs is selected. The pages will be numbered consecutively. Other print functions may or may not offer
the option of adding to the queued Post Script file.
If
to some other location, a subfolder will be made of the patient’s name in the
patient directory, followed by a sub-directory made of the date.
Print Queued Jobs
Hitting
this button will submit the accumulated Post Script file for printing. There is also access to printing the queue
from the Printer Toolbar shown below and other applications may provide other
access to printing the queued job. If
you exit the program with an open non-empty queue, you will be given the option
of printing before the program exits.
Delete Queued Jobs
Hitting
this button will complete the current open Post Script file but will not submit
it to be printed. The file is in the
temporary directory located by the tmp.dir.loc file
in the program resources directory (located by the rlresources.dir.loc
file in the current directory) or (after May 2012) will be in a subfolder of
the patient’s directory.
Save to file.
You
may save your print screens along with your comments by hitting the Save As
button on the popup. The files are saved
under the directory patient name/scd.d. You may make subdirectories below scd.d to organize your print screen files. In the Get File and Directory popup, you can
type in the name of a subdirectory to add below the directory currently shown. Then enter in a file name. You may want to resize this window to show
all the text. Note also that you can
view the complete path to a file or select to see only the current file
names. You cannot navigate above the scd.d directory.
|
Get File Name and Directory Popup |
The
comments you enter are stored under the file name that you specify. The image is stored under the file name with
the extension .rgb added. Unix does not have a
limit to the length of file names, but certain characters are not allowed. The program will strip out illegal characters
in a file name for you. If you need to
reorganize or delete files, use the operating system tools provided. On SGI you have the Desktop which is graphical,
or you can use the standard unix
and linux commands, among them are: cd, mv, cp, rm, rmdir,
ls. On Windows
there is Windows Explorer and similar DOS commands.
Printer Toolbar

The Printer Toolbar is shown above. You can select a different printer que here. However, this will not effect an existing queued job, only new print jobs. Option to print or the delete the existing queued job is also provided here. This tool bar is gotten to under the Options pull down on the main toolbar.